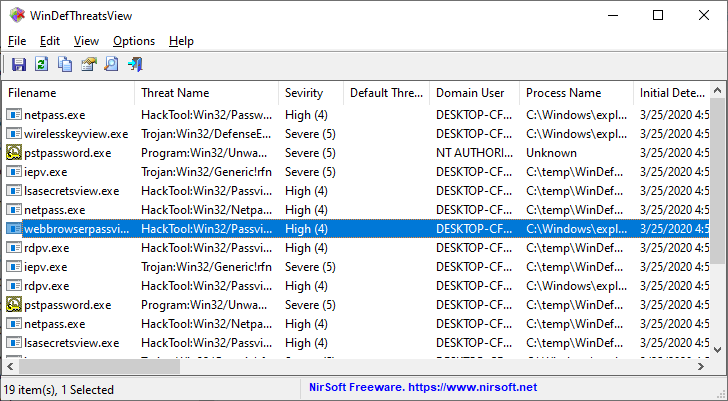
Archive for the ‘Utilities Update’ Category

PropertySystemView is a new tool that allows you view and modify the properties of a file from GUI and command-line, using the property system of Windows operating system.
For example, you can use this tool to modify the ‘Media Created’ timestamp stored in .mp4 and .mov  files , ‘Date Taken’ stored inside .jpg files,  ‘Content Created’ and ‘Date Last Saved’ values stored in Microsoft Office files (Word and Excel), Title, Authors, Comments, Tags, ‘Last Saved By’, and many other properties…
PropertySystemView also allows you to set properties of Windows. For example, you can set the System.AppUserModel.ID property of a window in order to disable the taskbar grouping of the specified window.

Property System Viewer - docx file

You can download this new tool from this Web page.


The new version of AdvancedRun tool (version 1.15)  allows you to easily launch a program with the desired run options directly from Windows Explorer.
In order to activate this option, run the AdvancedRun tool and then click the ‘Add Explorer Menu’ button:

AdvancedRun - Add Explorer menu

After activating this option, every time that you right-click on .exe file or on a shortcut to .exe file, you’ll see the ‘Advanced Run’ menu item:

Advanced Run Explorer Context Menu

If you choose the ‘Advanced Run’ menu item, the AdvancedRun window is opened with the selected .exe file inside the ‘Program to Run’ field and then you can choose to run the program with the desired option, like running the program as SYSTEM user, running the program without elevation, running the program with the specified user name and password,  running the program with the specified environment variables, and so on…
In the example below – after selecting regedit.exe and choosing the ‘Advanced Run’ menu item, the window of AdvancedRun  is opened with regedit.exe as the program to run. In the ‘Run As’ field the ‘SYSTEM user’ option is  selected,  and the when clicking the Run button – RegEdit will be executed as SYSTEM user.

Advanced Run RegEdit As System User

Finally, if you don’t want the ‘Advanced Run’ menu item anymore, simply click the ‘Remove Explorer Menu’ button and this menu item will be removed.


BrowserDownloadsView is a new tool for Windows that displays the details of files you downloaded with Chrome and Firefox Web browsers. For every download, the following information is displayed: Filename, Download URL, Web Page URL, Start Time, End Time, Download Duration, Download Size, Web Browser, and more…
BrowserDownloadsView allows you to load the downloads list from your current running system (your user or all user profiles), from remote computer on your network , and from external hard drive.
After BrowserDownloadsView loads the downloads list, you can select one or more downloads and then export them to comma-delimited/tab-delimited/html5/xml/JSON file, calculate the MD5/SHA1/SHA256/SHA512 hash of the downloaded files, copy the downloaded files to the clipboard and then paste them into a folder on Windows Explorer, open the downloaded file in VirusTotal Web site, and more…

View Web Browser Downloads

You can download the new BrowserDownloadsView  from this Web page.

The new version of WifiInfoView (2.60) allows you to easily create a shortcut on your desktop to connect the desired wireless access point. You can create 2 types of shortcuts: ‘Connect Access Point By BSSID’ and ‘Connect Access Point By Name’.
If you have multiple access points with the same name (Wifi Extenders) and you want to create a shortcut to connect only a specific access point, you should create the ‘Connect Access Point By BSSID’ shortcut. Otherwise, you should use the ‘Connect Access Point By Name’ shortcut.

In order to create the desired shortcut, simply select your access point in WifiInfoView , right-click with the mouse and then from the ‘Create Desktop Shortcut’ submenu choose the shortcut you want to create:

connect wifi access point shortcut menu

WifiInfoView will ask you if you want to create the shortcut, choose ‘Yes’ to create it:

connect wifi access point shortcut question

After choosing ‘Yes’, you should see on your desktop the new shortcut to connect your wifi access point:

connect wifi access point shortcut

Optionally, you can right-click on the shortcut, choose ‘Properties’ and then in the ‘Shortcut Key’ field – type the key combination to activate the shortcut.


The new version of BrowsingHistoryView allows you to delete individual history records of Chrome and Firefox Web browsers. This feature also works with other Web browsers that use the same history database of Chrome/Firefox, like Waterfox, SeaMonkey, Vivaldi, Yandex, and so on…
In order to delete the history records of Chrome  or Firefox, simply select the desired records, and then from the File menu or from the right-click context menu, choose the ‘Delete Selected History Records’  option (You can also press Ctrl+Delete).

Delete Chrome Firefox History

BrowsingHistoryView will ask you if you want to delete the selected history records. Click the ‘Yes’ button to delete them.

Delete Chrome Firefox History Question

You can download the new version of BrowsingHistoryView from this Web page.

The new version of USBDeview  tool (2.85)  allows you to create a shortcut on your desktop to stop, disable, enable,  or disable/enable a specific USB device.
In order to create the shortcut, simply right-click on the desired USB item, and then from the ‘Create Desktop Shortcut’ sub menu choose the desired action for the shortcut – Disable Device, Enable Device, Disable+Enable Device, or Disconnect Device.

Create USB Disable-Enable Shortcut

After the shortcut is created, you can optionally right-click on the shortcut, choose ‘Properties’ and then set a shortcut key to activate the shortcut. Be aware that the shortcut will only work with the specific USB device you selected.

Desktop USB Device Shortcuts

MobileFileSearch is a new tool for Windows that allows you to search files inside your Smartphone or tablet plugged to the USB port on your computer,  with Media Transfer Protocol (MTP).
You can search files by their name (using wildcard), their modified/created time and their size.

 MobileFileSearch also allows you to activate the search from command line and then export the files list to comma-delimited/tab-delimited/html5/XML/JSON  file, or copy the found files to the desired folder on your computer.  For example, you can execute a command that automatically copies all .mp4 videos generated by the camera of your Smartphone in the last day into a folder on your computer.

Mobile Device Search Options

Mobile Device Search Result

You can download the new MobileFileSearch tool  from this Web page.

The new version of WifiInfoView (2.55) allows you to connect specific access point from the GUI and from command-line.
In order to connect the desired access point from the GUI,  simply select the access point in the main window of WifiInfoView, and then choose ‘Connect Selected Access Point’ from the right-click context menu, or press F2.

Connect Selected Access Point BSSID

Selected BSSID Connected

If you want to connect the desired access point from command-line, you can use the  /ConnectAP command-line option.
In the /ConnectAP command-line option, you have to specify the wireless network name (SSID) and the MAC address of the access point (BSSID), for example:
WifiInfoView.exe /ConnectAP “mynet” “00-25-9C-15-1C-42”

You can download the new version of WifiInfoView from this Web page.

Windows Updates History Viewer is a new tool that displays the history of windows updates installation on your system.
This tool can extract the Windows updates information in 2 modes:

  1.  Extract the installed Windows updates history from your local system, using API.
  2. Extract the installed Windows updates history by reading directly the Windows updates database (DataStore.edb) from external drive or from remote computer on your network (If you have admin access to the remote computer)

Windows Updates History Viewer

For every Windows update history record, Windows Updates History Viewer displays the following fields: Title, Description, Install Date, Update Operation (Install, Uninstall, Not Started, In Progress), Operation Result (Succeeded, Succeeded With Errors, Failed, Aborted), Category, Information URL, Support URL, Uninstall Notes, Client Application ID, Service ID, Update ID, Revision Number, Unmapped Result Code, Server Selection, hResult.

You can download this tool from this Web page.

The new version of SoundVolumeView tool (2.00) allows you to easily create shortcut on your desktop that will execute one of the following actions: Mute,Unmute,Mute/Unmute Switch,Disable,Enable,Disable/Enable Switch, Set Default Device (Console, Multimedia, Communications), Increase Volume, Decrease Volume.
For example: You can create a shortcut to disable/enable your speaker or Microphone device,  set specific audio device as default,  mute / unmute the sound of your Web browser,  decrease / increase the sound volume of your media player, and so on.
In order to create the desktop shortcut, simply select the desired items in the main window of  SoundVolumeView , and then go to File -> Create Desktop Shortcut and choose the desired action to execute when the shortcut is activated. You can also use the ‘Create Desktop Shortcut’ submenu in the right-click context menu.

Create shortcut to mute,unmute,change sound volume

After creating a shortcut, you can right-click on it, click ‘Properties’ and then in the ‘Shortcut Key’ field you can select the desired key combination to activate the shortcut.

Shortcuts to mute,unmute,change sound volume

Mute and unmute shortcut key