Archive for the ‘NirSoft Tips’ Category

If you recently had a power outage in your area, and you want to find out when the power was back on, there is a small trick to discover this information – by using wireless networks !
This trick only works if you live in Densely populated area with dozens of wireless access point around you, and only if the power outage was in the last few days.

Here’s a little explanation about how it works: every wireless access point has a timer that starts from zero when the router is loaded and this timer is constantly broadcasted with the access point name and other information.
The timer is also set back to zero from time to time (Depending on router model) without restarting the router, but in the short term, it’s still possible to use this timer to detect when the router was started.

When the power comes back after a power outage, all routers are loaded almost at the same time, and this time roughly represents the time that the power was back on.

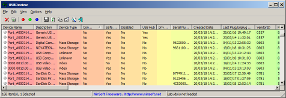
The WifiInfoView tool of NirSoft, receives the wifi timestamp of every wireless access point, calculates the time when the timer was started and displays this time under the ‘Start Time’ column.
In order to discover when power was back on, you have to click the ‘Start Time’ column header for sorting the list by the timer of every access point.
If you had a power outage recently, you should see that many access points have almost the same start time value.

In the screenshot below, which was taken a few hours after real power outage, the ‘Start Time’ of multiple routers is between 15:37 – 15:39

Wifi Access Point Timestamp

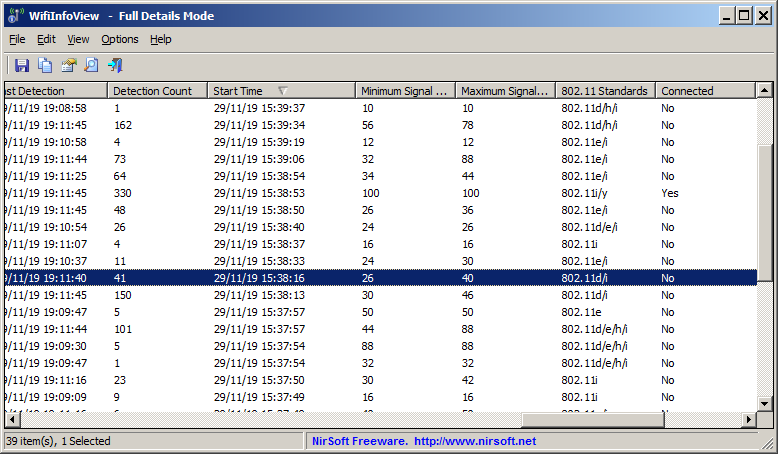
It means that the power was back on around 15:37.
The reason for the 2 minutes time-difference between the access points is their loading speed. In the slower routers, the timer started 2 minutes after the power was back on.

A few months ago I had an idea to add ‘Easter Eggs’ into a few tools and then publish the information about how to activate them before Easter holiday.
I didn’t want to spend too much time on it or to bloat the size of the .exe file, so I made something very simple – painting the main window of the tool
in multiple colors when pressing a specific combination of keys.

Currently there are 15 tools that have this ‘Easter Egg’ feature, the idea is the same in all of them, but in every tool the colors effect is a little different.

How to activate

In order to activate the ‘Easter Egg’ follow the instructions below:

  • Hold down the Ctrl and Shift key while the tool is in focus.
  • Type the following sequence of letters: C L R
  • In some tools you should type the following sequence of letters instead: C O L O R S
  • Pressing the same key combination again will switch the tool back to normal colors.

Warning: If you have shortcut keys on your system with combination of Ctrl+Shift and one of the specified letters (C O L O R S), you should turn them off
before trying the Easter Egg key combination… Otherwise, you’ll activate these shortcut keys instead of NirSoft Easter Egg.
Also, before trying the Easter Egg key combination, you should check if any menu item uses Ctrl+Shift and one of the specified letters as shortcut key and
if you find it, it means that the Easter Egg key combination is not available on this tool.

Here’s some examples for NirSoft tools after activating the Easter Egg:

After playing with painting NirSoft tools in colors, I had a new idea for another kind of ‘Easter Eggs’, much more serious than some colors in a window.
In the next few days you’ll see the result of this new idea, I’ll publish all information about it in this Blog when it’s ready.
You can find a first hint inside one of the above screenshots…

In the last few weeks, I added support for recovering passwords from external hard drive contains the most recent versions of Windows (Windows 10, Windows 8, Windows 7) for some of the NirSoft Password-Recovery tools, including IE PassView, ChromePass, Network Password Recovery, and WirelessKeyView.
Until now there was only support for reading external drive passwords of Windows XP or Windows Vista and I had to do a very intensive reverse engineering in order to upgrade my DPAPI decryption code to work with Windows 7 and newer systems.
In addition to the upgrade of existing tools, there are also a few new utilities in development process that are specifically designed to extract passwords from external hard drive.

The combination of external drive support and the shadow copies of Windows also allows you to recover old passwords from a few weeks ago instead of the current passwords stored on your system.

Here’s an example for using the external drive support to recover previous passwords stored in your system:

First… You have to run the  ShadowCopyView utility to check the current shadow copies you have on your system.
If the main window of ShadowCopyView is empty, it means that there are no shadow copies and thus you cannot recover old passwords stored in your system.

In the following sample screenshot, you can see that there is a single shadow copy and its path is \\?\GLOBALROOT\Device\HarddiskVolumeShadowCopy1


Now… Lets say that you accidentally deleted the passwords stored by Internet Explorer and now you want to recover them, so in IE PassView tool you should go to the ‘Advanced Options’ window (F8) and , choose the ‘Load the passwords from the following user profile’ option,  and then type the shadow copy path of your user profile.

For example, if your user profile is stored in c:\users\nirsoft64 and the shadow copy path is \\?\GLOBALROOT\Device\HarddiskVolumeShadowCopy1 then the correct path that you have to type is  \\?\GLOBALROOT\Device\HarddiskVolumeShadowCopy1\users\nirsoft64 :


You also have to type the logon password of this user profile, because the logon password is needed to decrypt the passwords.
Assuming that you type the correct user profile path and logon password, IE PassView will decrypt the passwords stored by IE in the date that the shadow copy was created.
You can also use the same technique with the other tools that have external drive support (ChromePass, Network Password Recovery, WirelessKeyView, Dialpass )

Be aware that like any password-recovery tool, these tools trigger warnings and alerts in many Antivirus programs and your Antivirus software, firewall, or even your Web browser may block you from downloading them.


Recently, I have received multiple reports from users of Internet Explorer 10 ( On Windows 8 ) saying that my history/cache utilities fail to work with IE10, and they are right…
As opposed to all previous versions of Internet Explorer that used the same file structure to store the history/cache/cookies information, IE10 uses a completely new file structure. Instead of the old index.dat file, IE10 stores all cache/history information inside a single Jet Blue database (Also known as ESE database or .edb file). This database file is WebCacheV24.dat, and it’s located under C:\Users\[User Profile]\AppData\Local\Microsoft\Windows\WebCache folder

I have already developed the code to read this file in order to update my tools for Internet Explorer 10, but there is still one major problem with this file: While Internet Explorer is opened, and also a few minutes after it’s closed, this file is completely locked, and other software (like my tools) cannot open it. There is one solution to bypass this database locking problem – by copying the database into another location using ‘Volume Shadow Copy’ service and then reading the copy of the database.

Reading the locked database using the ‘Volume Shadow Copy’ method has a few drawbacks:

  1. This process and quite slow and aggressive.
  2. It works only with full admin rights.
  3. On 64-bit systems, only 64-bit application can use this service.
  4. The copied locked database doesn’t contain the latest browsing history. The latest history/cache is written to the database a few minutes after closing the IE10 Web browser, when the file is unlocked.

Generally, I prefer to avoid from using this ‘Volume Shadow Copy’ method and find a better way to read the locked database of IE10. For now, I updated only one tool, BrowsingHistoryView, for reading the browsing history of IE10. There is also an option to read the history when the database file is locked (using Volume Shadow Copy), but it’s active only when running BrowsingHistoryView.exe with /UseVolumeShadowCopy command-line parameter:

BrowsingHistoryView.exe /UseVolumeShadowCopy

If you have a system with Internet Explorer 10, you’re welcomed to try it and see if it’s reasonable to use this ‘Volume Shadow Copy’ method regularly. Remember that you have to execute BrowsingHistoryView as administrator, otherwise, it won’t be able to read the history file while it’s locked.

RTMPDump toolkit is a quite impressive open source project that allows you to download RTMP video/audio streams. However, using this tool under Windows operating system is not very easy.

My new utility, RTMPDumpHelper, is exactly what need in order to easily download  RTMP streams with RTMPDump toolkit under Windows operating system.  By combining this utility and the proxy server of RTMPDump toolkit, you can simply open a Web page containing RTMP video stream in your favorite Web browser, and while watching the video, it’ll be saved to your disk automatically as .flv or .mp4 file.

RTMPDumpHelper and RTMPDump toolkit

RTMPDumpHelper and RTMPDump toolkit

You can download my new RTMPDumpHelper utility from this Web page.

The RTMPDump toolkit is available to download from this Web page.

If you can’t remember the login password of your Gmail account, there is still a chance that you can easily recover your lost password, as long as the password is stored in your computer by the email software or by the Web browser that you use.

There are 2 freeware utilities that can help you to recover your lost Gmail password: Mail PassView to recover the password from popular email clients, like Outlook and Windows Live Mail, and WebBrowserPassView, to recover the password from your Web Browser.

Here’s some information about how to use these 2 utilities to recover your lost Gmail password:

  • Mail PassView: If you use a popular email software to receive and send messages on your Gmail account, like Outlook, Outlook Express, Windows Live Mail, or Thunderbird – You can use this utility to recover your Gmail password, assuming that you allowed your email software to save the password.
    In order to use this utility to recover your password, download Mail PassView from directly from this link.
    After you download it, open the zip file and run the mailpv.exe executable. Be aware that because this utility can extract password from your system, your Antivirus software may display an alert and even block you from running this .exe file.

    After running Mail PassView, the main window displays the details of all email accounts found in your system. In order to find the password of your Gmail account, you should locate the record where the value of the server column is pop.gmail.com or imap.gmail.com

    If you located the correct gmail record, you should see the Gmail password that you need under the Password column, as demonstrated in the following sample screenshot:

    Recover lost Gmail password with Mail PassView

    Recover lost Gmail password with Mail PassView

  • WebBrowserPassView: If you use a Web browser (Internet Explorer, Firefox, Opera, or Google Chrome) to login into your Gmail account, This utility can help you to recover your lost Gmail password, assuming that you chose to remember this password.
    In order to use this utility to recover your password, you can download it directly from this link.After you download it, open the zip file and run the  WebBrowserPassView.exe executable.  Be aware that because this utility can extract password from your system, your Antivirus software may display an alert and even block you from running this .exe file.After running WebBrowserPassView, the main window displays the list of all passwords stored by your Web browsers.
    In order to find the password of your Gmail account, you should locate the record where the URL column is https://www.google.com/accounts/servicelogin

    If you located the correct record, you should see the Gmail password that you need under the password column, as demonstrated in the following sample screenshot:

    Recover lost Gmail password with WebBrowserPassView

    Recover lost Gmail password with WebBrowserPassView

If you can’t remember the login password of your facebook account, there is still a chance that you can easily recover your lost password, as long as the password is stored in your computer by the Web browser you use.

You can try to recover your facebook password by using the WebBrowserPassView utility. This utility can recover the password from 4 different Web browsers – Internet Explorer, Firefox, Opera and Google Chrome. You can download this utility directly from this link.

After you download it, open the zip file and run the WebBrowserPassView.exe executable. Be aware that because this utility can extract password from your system, your Antivirus software may display an alert and even block you from running this .exe file.

After running WebBrowserPassView, the main window will display all the passwords stored by your Web browser. In order to find your facebook password, you have to locate the record line where the URL is http://www.facebook.com or http://www.facebook.com/login.php
If you located the correct facebook record, the password that you need will be found under the ‘Password’ column, as you can see the in the following sample screenshot:

Recover Facebook Password

Recover Facebook Password

If you can’t find any record with facebook link, your facebook password is probably not stored by your Web browser. Also, be aware that WebBrowserPassView cannot locate your password if it’s protected by a master password, or if it’s stored by a Web browser other than Firefox/IE/Opera/Chrome.

A few months ago, I released a new version of both SmartSniff and SniffPass with support for using them with Microsoft Network Monitor 3.x

In the release details, I also specified that ‘Wifi Monitor Mode’ button was added for using ‘Monitor Mode’ under Windows Vista/7/2008, but without giving extensive explanation about how to use this feature. So in this blog post, I’ll add more details about this ‘Wifi Monitor Mode’ and how to use it on SmartSniff and SniffPass.

When a wireless network card enters into a ‘Monitor Mode’, it listens to specific channel that you choose and captures all the packets that are sent by wireless networks on your area in the specific channel that you selected.  If the wireless network that sent the packet is unsecured,   SmartSniff and SniffPass will be able to show you the packets data.

Before I start to explain you how to use this mode, here’s the system requirements for using  ‘Monitor Mode’:

  1. Unfortunately, this mode is only supported on Windows Vista, Windows 7, and Windows Server 2008. Windows XP is not supported.
  2. Both the network card and the device driver must support this mode. I currently don’t have a list network cards that support this mode under Windows. However, if you manage to get your card into monitor mode, it’ll be nice if you post your card model as comment to this Blog post.
    Also, be aware that according to Microsoft, some Wifi drivers may cause a system crash when entering into monitor mode.

Finally, here’s the instructions for using ‘Wifi Monitor Mode’ with SmartSniff and SniffPass:

  1. First, download and install the latest version of Microsoft Network Monitor 3.x if it’s not already installed on your system.
  2. Run SmartSniff if you want to capture general TCP data or SniffPass if  you only want to capture passwords. Be aware that SniffPass can only capture passwords that are not encrypted. Most Web sites and services of large companies use SSL to encrypt the passwords, and thus SniffPass cannot capture them.
  3. Go to the ‘Capture Options’ window (F9), choose  ‘Network Monitor Driver 3.x’ as a capture method, and then click the ‘Wifi Monitor Mode’ button.
  4. In the opened ‘Wifi Scanning Options’ window, choose the right wireless card (in most cases you should have only one) and then check the ‘Switch to Monitor Mode’ option.
  5. You can now select to scan a single channel or to switch between multiple channels every x milliseconds.  After you selected the desired channels, click the Apply button.

    Wifi Scanning Options

    Wifi Scanning Options

  6. The most important thing: Leave this window opened !
    When you close this window, the network card will exit from monitor mode and it’ll return back to its normal state.
  7. In ‘Capture Options’ window of SmartSniff/SniffPass – select the right wireless card and then press the ‘Ok’ .
  8. Finally, press F5 to start the capture. If you have any active unsecured networks in your area, you’ll be able to see the captured data.
  9. After you finish, close the ‘Wifi Scanning Options’ window, so your wireless card will return back to normal.

The information in this article is provided for educational purposes only and for making people aware of the risks of using unsecured wireless networks.  it’s not intended to be used for any illegal activity.

SmartSniff is a TCP/IP sniffer utility that allows you to capture TCP/IP packets on  your network adapter, and view the captured data as sequence of conversations between clients and servers.  By making some changes in the ‘Advanced Options’ window, you can use  SmartSniff as alternative to CurrPorts utility, and only view the general TCP connections activity on your network adapter, without capturing the data.  SmartSniff shows some information that is not available in CurrPorts utility, including number of packets, total transferred data, and current data speed in KB/Sec.

Here’s how to configure SmartSniff to only show general TCP connections activity:

  1. Open the ‘Advanced Options’ window (Ctrl+O).
  2. Select the ‘Only Display TCP/IP statistics’ option, so SmartSniff won’t create a large capture file.
  3. Select the ‘Retrieve process information’ option, so SmartSniff will display the process of every connection, like CurrPorts utility.
  4. Select the ‘Display only active connections’, so SmartSniff will automatically remove all closed connections from the list.sniffer_options
  5. Click the  ‘Ok’ button in the  ‘Advanced Options’ window. In the main window, Select the ‘Hide Lower Pane’ option under the Options menu. The lower pane is not needed when you don’t capture the TCP data.
  6. Start capture (F5) and watch the  TCP connections activity.

sniffer_statistics

BlueScreenView utility allows you to watch the blue screen crashes  occurred in your system by reading and analyzing the MiniDump files created on every crash by the operating system. The MiniDump files are usually created under C:\WINDOWS\Minidump, unless the path was modified in the system failure settings of Windows.

In most systems, Windows is already configured to create these MiniDump files as the default system failure configuration.

However, if from some reason MiniDump files are not created in your system during a blue screen crash, you should follow the instructions below in order to configure Windows to create them.

For Windows XP:

  1. Right-click on the  ‘My Computer’ icon and choose ‘Properties’. Alternatively, you can also go to Control Panel and open the ‘System’ applet.
  2. In the opened window, click the ‘Advanced’ tab and then inside the ‘Startup And Recovery’ frame, click the ‘Settings’ button.

    System Properties Window

    System Properties Window

  3. In the opened ‘Startup And Recovery’ window,  there is ‘Write Debugging Information’ section. You should set the combo-box in this section to ‘Small memory dump’, and then click ‘ok’ to confirm the change.

    Startup And Recovery

    Startup And Recovery

For Windows 7:

  1. Go to the Control Panel, choose ‘System And Security’, and then click ‘System’, and then click the ‘Advanced System Settings’ link.
  2. In the opened window, click the ‘Advanced’ tab and then inside the ‘Startup And Recovery’ frame, click the ‘Settings’ button.
  3. In the opened ‘Startup And Recovery’ window,  there is ‘Write Debugging Information’ section. You should set the combo-box in this section to ‘Small memory dump’, and then click ‘ok’ to confirm the change.

You can also make this MiniDump change in the Registry, by setting the following value:

Windows Registry Editor Version 5.00

[HKEY_LOCAL_MACHINE\SYSTEM\CurrentControlSet\Control\CrashControl]
“CrashDumpEnabled”=dword:00000003

However, be aware that this Registry change affects the system only after reboot.