Notice: The latest version of NirLauncher package is now available at http://launcher.nirsoft.net/
As I promised a few weeks ago, the Beta version of NirLauncher, with a package of more than 100 utilities of NirSoft, is available to download.

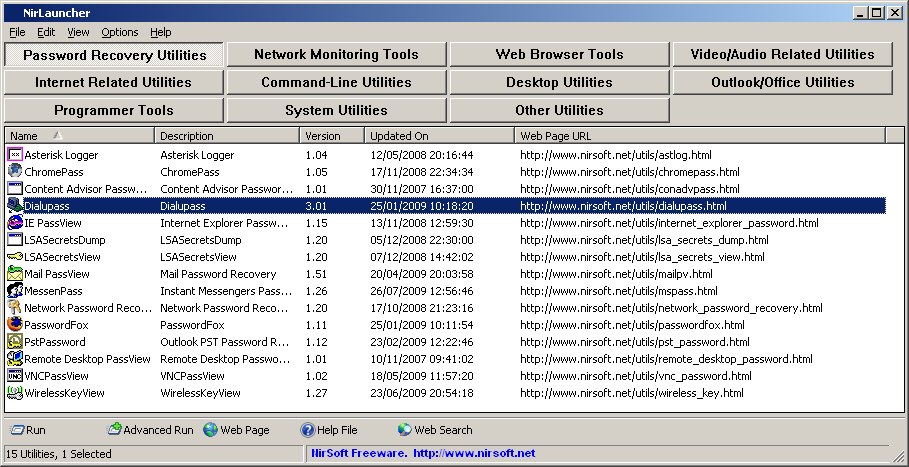
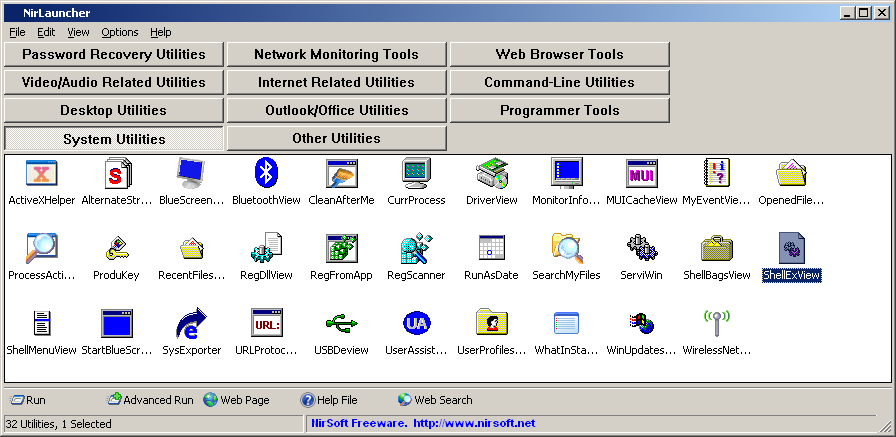
NirLauncher Screenshot
Before you go to the download link, it’s important that you read the following guidelines:
- For now, the download link of this utilities package is a little restrictive. I only allow to download it 5 times per day for each IP address. So please don’t download this package with any ‘download accelerator’ software that open multiple connections. If you do so, the download might be failed and your IP address will be blocked from downloading this file for a few hours.
Also, the download link won’t work if you put it on other Web sites.
I’ll try to gradually reduce these restrictions as long as it won’t eat my server resources. - Antivirus False Positives – This package contains more than 100 utilities, and if you have any Antivirus on your computer, there is a very high chance that it’ll falsely detect one or more of these utilities as Virus/Trojan/Spyware/Malware or anything else.
It’s also possible that your Antivirus will simply delete some of the utilities or prevent you from running them without displaying any alert.
In any case, please don’t flood my email address with messages like “You have virus in your utilities package” or “After I extract your files, some of them are deleted” or “I double-click xyz utility and nothing happens”. All complaints about false virus alerts, utilities that cannot be executed, and disappearing files should be sent to the Antivirus companies that cause these troubles.
You are also welcomed to read my Blog post from a few months ago: Antivirus companies cause a big headache to small developers. - You might find out that some of my utilities in this package are missing. For now, to avoid from including very old utilities, my scripts that build the NirLauncher package automatically take only utilities that have been updated in the last 1000 days. Some of my very old utilities might still save the settings into the Registry, and I don’t want to include them in NirLauncher package, because this package should be fully portable.
Later, I’ll gradually check my old utilities and some of them will be possibly upgraded to be included in future releases of NirLauncher package. - Currently, the software groups (categories) in NirLauncher are not the best choice, I simply took them with automatic scripts from my main utilities page. I hope that I’ll create better software groups in future versions.
- Start using NirLauncher: In order to start using NirLauncher, simply create a new folder in your USB flash drive or in any other drive, and then extract all files of the package into the new folder.
You should not extract the files into the root directory of your USB flash drive, because the package contains too much files.
After you extracted the package, simply run the NirLauncher.exe executable. - After running NirLauncher, here’s some tips for using it:
- You can use F7 and F8 keys to move to the next and previous software group.
- When you select a single item, the ‘Description’ and ‘Web Page URL’ become a link that you can click. Clicking the ‘Description’ opens the help file, and clicking the ‘Web Page URL’ opens the right utility Web page. If you are not pleased from this feature, you can disable it from Options->Advanced Options (set all click options to none)
- If you want to view a longer description of each utility that you select, check the ‘Show Description Text’ under the options menu. However, be aware that these description texts were taken from the pad files of my utilities, and they are not always updated to the latest features of each utility.
- If you want to run a utility with command-line parameters, change the current directory, and so on, the ‘Advanced Run’ is the right option that you need.
- There is also a generic ‘Advanced Run’ window that affects all utilities that you execute with the standard ‘run’ option: Options -> Default Run Settings. For example, if you open the ‘Default Run Settings’ window and select the ‘Run in full screen mode’ option, all console application that you run will be opened in full screen.
- If you use the x64 version of Windows, and you click on a utility that have a separated x64 version, NirLauncher automatically run the x64 executable of the utility. The x64 executable filenames in the package are in UtilityName-x64.exe format.
- Warning for Windows 7/Vista users: For now, do not run NirLauncher.exe with ‘Run As Administrator’ option. It seems that using this option cause my ‘Network Password Recovery’ utility and a few others to crash lsass.exe process if you run them from NirLauncher that was executed with ‘Run As Administrator’ option. The reason for this problem is still unknown, and more research is required to fix it.
If you want to force a specific utility to run with admin permissions, simply use the ‘Run As Administrator’ option (Ctrl+M) inside NirLauncher.
Here’s a few optional tips for more advanced users. If you don’t need them, you can skip to the download link in the bottom of the post.
- The package contains a file named ‘nirsoft.nlp’ (NLP = NirLauncher Package) . This file contains the list of all software groups and utilities that are displayed in NirLauncher. It’s a very simple text file, like .ini file of Windows, that you can easily view and edit with any text editor. So, although the current version of NirLauncher doesn’t support editing, you can change the software groups and utilities list displayed in NirLauncher by editing this file.
- When editing the .nlp file, it’s recommended that any file that you specify will be in relative path. For example: if you want to add an executable file located in a subfolder named ‘MyPackage’ under the main launcher folder, you should specify it as ‘MyPackage\myfile.exe’ instead of ‘i:\nirsoft\MyPackage\myfile.exe’.
- The ‘help’ value in .nlp file specifies that help file (.hlp or .chm). However, if the help filename has the same name of the executable (like cports.exe and cports.chm), NirLauncher will detect it automatically.
- The ‘AppName’ value specifies the application name, while the ‘ShortDesc’ value specifies a short description. If you don’t specify these values, NirLauncher will take them from the version resource of the .exe file.
- The ‘LongDesc’ value is the text that appeared in the yellow description box of ‘Show Description Text’ option.
- NirLauncher also allows you to add additional software packages. Just for example, here’s how to add Sysinternals Suite into NirLauncher:
- Go to Sysinternals Suite Web page, and download the latest zip file.
- Extract the zip package of Sysinternals into a new folder located in the same drive of NirLauncher.
- Download the sysinternals.nlp that I created for Sysinternals Suite, and save it into the same folder with all Sysinternals files.
- Drag this sysinternals.nlp into the main window of NirLauncher. You can also use the “Add Software Package” from the Launcher menu.
- If you did it right, you should now see the Sysinternals package in the main window of NirLauncher. You can switch between the packages by using F3 and F4 keys.
- You may notice that full description text and Web Page URL are empty. This is because they are not filled in the sysinternals.nlp that I created.
However, the ‘Open Web Page’ option (Ctrl+W) will still work properly for most of the SysInternals utilities even without the URL information, thanks to the “I’m feeling lucky” feature of Google. When there is no URL, I simply send the utility name to Google, and the first page in the search result is automatically opened.
Finally, here’s the download link:
Download NirLauncher package with more than 100 utilities
Zip File Information: (to verify that the downloaded file is Ok)
MD5: b18f2706b2737128a9f7fd01648f5e38
SHA1: 353bd70b747dc73f58daec120df25a23330d0545
Size: 6,685,806 bytes
Number of files in the Zip: 241