Archive for the ‘NirSoft Tips’ Category

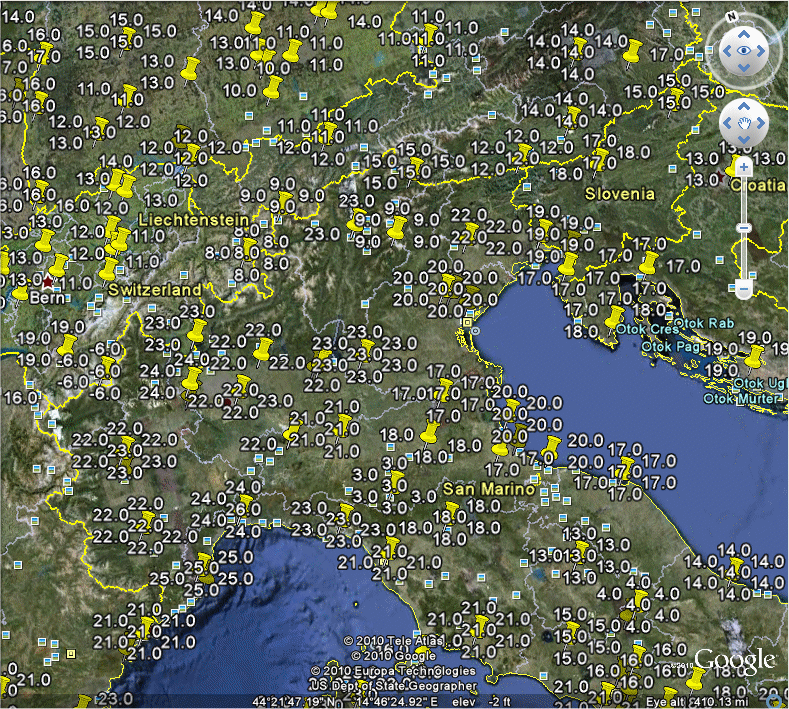
The latest release of MetarWeather utility allows you to watch the current  temperature around the world on the maps of Google Earth.

In order to use this feature:

  1. Download the latest METAR reports data file from  METAR Data Access Web site.
  2. Open the downloaded METAR file with MetarWeather (Ctrl+F) and wait until the METAR reports are loaded and displayed in the main window.
  3. Select all (Ctrl+A) the lines and choose the ‘Save As’ option (Ctrl+S)
  4. In the save dialog-box, choose ‘KML File – Temperature for Google Earth’ as a file type and save the .kml filename
  5. Finally, from Google Earth, open the created .KML file.

The result should look like the following map:

Google Earth Temperature Map

Google Earth Temperature Map

If you forgot or lost the password that you use to connect the Internet (With ADSL, cables, or other ISP account), you still have a chance to recover it, if this password is stored in your Windows operating system or in your router.

Here’s a list of 4 methods to recover your ADSL/ISP password:

  1. If you use Windows operating system to connect the Internet (with PPTP, LT2P, or PPPoE), you can use the Dialupass utility to recover your ISP password. When you run this utility, it can instantly recover your password, as long as the password is stored by Windows.
  2. If you got an email account from your Internet service provider, and the same password is used for both email account and the Internet connection, you can try to use the Mail PassView utility to recover your ISP password. If this password is stored by popular email software, like Outlook, Outlook Express, or Windows Live Mail, Mail PassView will be able to recover it.
  3. If you use a router to connect the Internet, you can try to use RouterPassView utility to recover the password from the configuration file of your router.
    In order to use this utility, you have to logon into your router, go to the backup/restore section, and choose to backup the router configuration into a file. After that, open the created configuration file with RouterPassView utility. If the config file of your router is supported, your password will be recovered instantly.
  4. If you use a router to connect the Internet, you can also try to use the AsterWin IE utility. This utility is quite old and was written many years ago in Visual Basic 6, but it still works with the latest version of Internet Explorer.In order to use this tool to recover the ISP password from your router, you should logon into your router, and then go to the router page that contains the ISP or ADSL logon details. after that, run AsterWin IE utility and click the ‘Show Internet Explorer Passwords’ window. This trick will not work for all routers, because some routers deliberately blocked this recovery option, from security reasons.

Some of NirSoft utilities like ServiWin, ProduKey, USBDeview, MyEventViewer, RegScannerNirCmd, and DevManView (a new device manager utility that will be released soon) allows you to connect a remote computer on your network and get the same result as you use it in the local computer.  In order to use this remote computer feature, you must have full administrator access to the remote computer.

Even if you have the admin user name and password of the remote machine that you wish to connect, you still have to configure it properly in order to get full  administrator access.
If you have a network with a domain controller, and you are the administrator of this domain, your life is a little easier, because some of configuration changes required to get admin access remotely are made by Windows automatically when the computer joins the domain.

Here’s a list of security configuration changes that you have to do in the remote machine, in order to get the administrator access remotely:

1.  Configure your Firewall. Depending on  the firewall that you use on the remote computer, you may need to change the firewall configuration in order to be able to connect the computer.
If you use the Windows firewall,you should go to ‘Allow Programs’/Exceptions section and verify that the ‘File And Printer Sharing’ option is checked.’
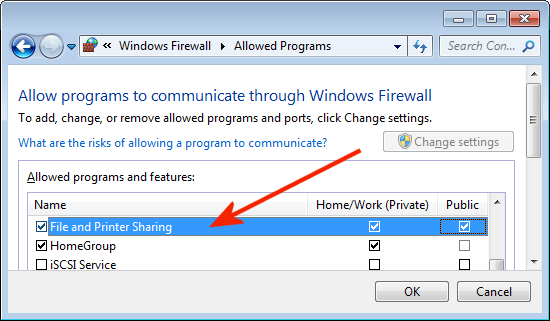
Enable 'File And Printer Sharing' in Windows Firewall

Enable 'File And Printer Sharing' in Windows Firewall

If you have another Firewall that filter the traffic by port numbers, you should configure it to accept incoming TCP/UDP packets with ports 135-139.
Warning: On your router that connect you to the Internet, you must verify that it’s not configure to forward ports 135-139 from the Internet into your machine. If the router is configured this way, your computer is in high risk of being penetrated by hackers and Trojans.

2. Change network security and sharing mode to classic:  On Windows XP, the default network sharing mode is ‘Guest Only’, which means that even if you log-on remotely as admin user, you’ll only get the access rights of regular user. In order to change this mode, go to the ‘Local Security Settings’ in Administrative Tools of Control Panel, and under Local Policies->Security Options, find the option of ‘Network and security model for local accounts’ and change it to classic mode.
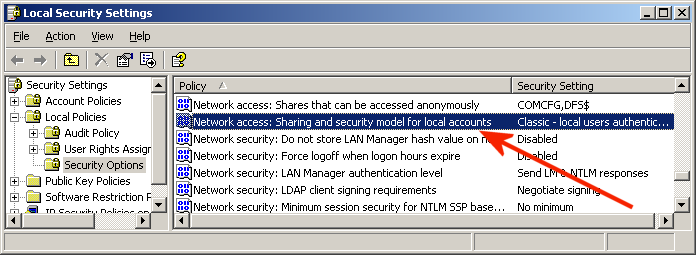
Sharing and security model

Sharing and security model

Alternatively, you can change the following Registry value to get the same effect:
Windows Registry Editor Version 5.00
[HKEY_LOCAL_MACHINE\SYSTEM\CurrentControlSet\Control\Lsa]
“forceguest”=dword:00000000

3.  Turn off the Remote User Account Control in Windows Vista and Windows 7:
By default, the User Account Control component of Windows 7/Vista doesn’t allow to get administrator access on a remote machine. In order to turn off this restriction, you should set the following Registry value:
Windows Registry Editor Version 5.00
[HKEY_LOCAL_MACHINE\SOFTWARE\Microsoft\Windows\CurrentVersion\Policies\System]
“LocalAccountTokenFilterPolicy”=dword:00000001

For more information about this Registry value, read here.

4. Starting the ‘Remote Registry’ service. Some of NirSoft utilities, like ProduKey and USBDeview, get the data from the remote machine by reading it from the Registry database.  On Windows 7/Vista, the ‘Remote Registry’ service is not started automatically by default,  so you have to start it in order allow these utilities to work on the remote machine.
You can start this service by using the Services module in Administrative Tools of Windows or by using the ServiWin utility of NirSoft.
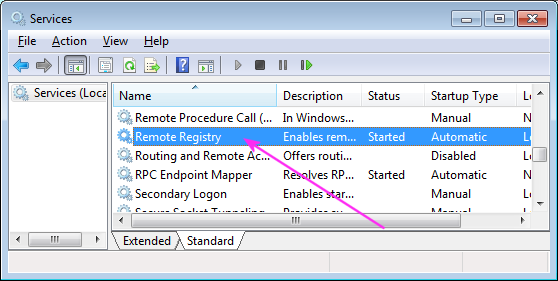
Remote Registry Service

Remote Registry Service

5. Connecting the remote machine. After making the above changes, you should be able to connect the remote machine and get full admin rights.
You can connect the remote machine by typing a path of admin share in the ‘Run’ text-box of Windows, for example:
\\192.168.0.11\c$
\\192.168.0.12\admin$
\\MyComp01\admin$

After a few seconds, Windows will ask you to type the user name and password for connecting the remote machine.
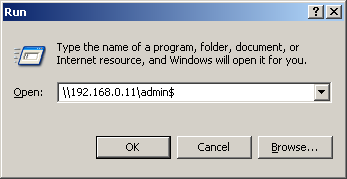
Connect the admin share of remote computer

Connect the admin share of remote computer

You can also connect the machine by using the ‘Net Use’ command, for example:
net use \\192.168.0.15 “MyPassword” /user:”MyPC\admin”

After connecting the remote machine, you’ll also be able to connect it with all NirSoft utilities that have the remote computer feature.
If you constantly work with NirSoft utilities, you probably already know that most of these utilities allows you to save the data into text, csv, html, or xml file from command-line, without displaying any user interface.

However, until now there was one drawback in this feature: The data was always saved in the original order, without any sorting.
So I finally started to add the command-line sorting feature into my utilities. I already added this sorting feature to the following 7 utilities, and I’ll gradually add it also to the others:  IECacheView, MozillaCacheView, CurrPorts, LiveContactsView, MyLastSearch, SearchMyFiles, and OpenedFilesView.

Here’s a few points about using this sorting feature:

  • For every utility that this feature is added, the data that you save from command-line will be sorted according to the last sorting that you chose from the user interface, by clicking the column header. If from some reason you still want to save the data without any sorting, like in the previous versions, you can still do that by using /nosort option, for example:
    IECacheView.exe /shtml c:\temp\iec.html /nosort
  • If you want to sort the saved data by another column, you can use the /sort command-line option. This option can accept a number as column index (0 for the first column, 1 for the second one, and so on) or the field name as appeared in the column header.
  • For example, if you want to sort by the first column (in the current columns order):
    IECacheView.exe /shtml c:\temp\iec.html /sort 0
  • If you want to sort in descending order, you should add ‘~’ character as prefix.  For example, to sort the third column in descending order:
    IECacheView.exe /shtml c:\temp\iec.html /sort ~2
  • You can also sort by more than one column, simply by specifying multiple /sort parameters. For example: to sort by the second column, and then by the first column in descending order:
    IECacheView.exe /shtml c:\temp\iec.html /sort 1 /sort ~0
  • If you choose the specify the sorting column by its name, you must put it in quotes if the caption contains one or more space characters. For example, to sort by Content Type in IECacheView:
    IECacheView.exe /shtml c:\temp\iec.html /sort “Content Type”
  • If you want to sort in descending order, the ‘~’ prefix must be inside the quotes, for example:
    IECacheView.exe /shtml c:\temp\iec.html /sort “~Content Type”
  • You don’t have the type the exact column name. Even if you write a partial name of the column, my utilities will locate the right column. For example, if you want to sort by the ‘Last Modified’ column, you can specify only ‘Modified’ as column name:
    IECacheView.exe /shtml c:\temp\iec.html /sort “Modified”

Notice: In all examples  specified above, I used IECacheView utility to demonstrate the command-line sorting feature.  However, you can use this feature in the same manner for all utilities that I add the sorting option.

IPInfoOffline utility has a new feature that allows you to easily insert country information for
each IP address inside the output generated by tracert (traceroute) or other network related tools.

For example, if the tracert output looks like this:


Tracing route to nirsoft.net [69.73.166.124]

over a maximum of 30 hops:


1 11 ms 13 ms 14 ms 62.189.147.43
2 25 ms 29 ms 27 ms 158.43.151.205
3 36 ms 37 ms 36 ms 146.188.14.125
4 55 ms 56 ms 55 ms 146.188.2.251
5 265 ms 131 ms 97 ms 213.248.105.45
6 79 ms 82 ms 92 ms 80.91.250.18
7 160 ms 158 ms 159 ms 80.91.250.209
8 175 ms 182 ms 186 ms 80.91.253.218
9 175 ms 173 ms 176 ms 213.248.90.54
10 180 ms 190 ms 181 ms 63.247.69.178
11 186 ms 184 ms 184 ms 209.51.131.90
12 170 ms 171 ms 172 ms 69.73.166.124


Trace complete.

After injecting country names with IPInfoOffline, it’ll look like this:


Tracing route to nirsoft.net [69.73.166.124 {United States} ]

over a maximum of 30 hops:


1 11 ms 13 ms 14 ms 62.189.147.43 {United Kingdom}
2 25 ms 29 ms 27 ms 158.43.151.205 {United Kingdom}
3 36 ms 37 ms 36 ms 146.188.14.125 {European Union}
4 55 ms 56 ms 55 ms 146.188.2.251 {European Union}
5 265 ms 131 ms 97 ms 213.248.105.45 {European Union}
6 79 ms 82 ms 92 ms 80.91.250.18 {European Union}
7 160 ms 158 ms 159 ms 80.91.250.209 {European Union}
8 175 ms 182 ms 186 ms 80.91.253.218 {European Union}
9 175 ms 173 ms 176 ms 213.248.90.54 {European Union}
10 180 ms 190 ms 181 ms 63.247.69.178 {United States}
11 186 ms 184 ms 184 ms 209.51.131.90 {United States}
12 170 ms 171 ms 172 ms 69.73.166.124 {United States}


Trace complete.

In order to get a result like this one, simply run tracert.exe of Windows with the host name you wish, and send the output into a file. After that, run IPInfoOffline.exe with /AddCountry, and specify the filename that you saved the trace.

For example:

tracert -d www.nirsoft.net > c:\temp\trace1.txt
IPInfoOffline.exe /AddCountry “c:\temp\trace1.txt”

IPInfoOffline is available to download here.

Most of the utilities in NirSoft Web site allows you to create a simple HTML report containing
the data that you need.

But what can you do if you want to get the report as image file ?

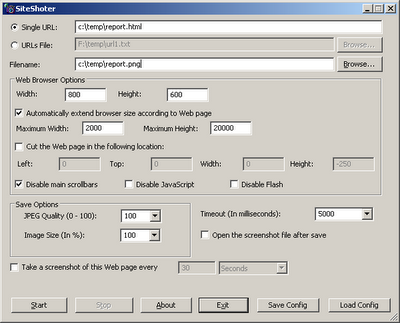
SiteShoter utility can help you do that. SiteShoter is a utility that allows you to save any Web page or HTML file into image file(png/jpg/gif).
Simply type the html file path in the URL field, choose all other parameters according to your needs, and then click the start button. It also recommened to set a low timeout value, because HTML files (As opposed to Web sites) are loaded pretty fast. If everything works fine, the image of your HTML file should be created in the location you specified in the ‘Filename’ field.

SiteShoter can also create images from command-line, for example:
SiteShoter.exe /URL “c:\temp\myreport.html” /Filename “c:\temp\myreport.png”

For more information about SiteShoter, click here.

The new version of VideoCacheView now allows you to easily save all flash videos currently opened in your Web browser, even without displaying any user interface. You can use this feature with most popular video sharing Web sites, like YouTube, iFilm, Metacafe, and so on.

Simply run VideoCacheView with /copyalltemp as command-line parameter and specify the destination folder to save the .flv files, for example:

VideoCacheView.exe /copyalltemp “c:\my video files”

You can also use /copyalltemp parameter without specifying the destination folder:

VideoCacheView.exe /copyalltemp

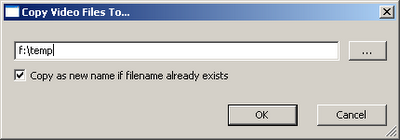
In this case, VideoCacheView will ask you to select the desired folder to save the flash video files:

If you download and install VideoCacheView with full installation support (VideoCacheView_setup.exe), the “Save All Opened Flash Videos” shortcut is automatically created in programs group of VideoCacheView.
Clicking this shortcut allows you to select the desired destination folder, and then all currently
opened flash videos are saved into the folder that you selected.

NirCmd utility has a new ‘speak’ command that allows you to easily cause your computer to speak the text that you wish. In this command, NirCmd uses the Speech library (SAPI) that is installed with any instance of Windows XP and Windows Vista.
The speak command is not the most useful command in NirCmd, but it’s a nice and funny addition for April Fools’ Day.

Here’s a few examples of what you can do with the new speak command:

nircmd.exe speak text “Please don’t touch my computer !”

If you want to wait 60 seconds and then speak something, you can try this: (60 seconds = 60000 milliseconds)

nircmd.exe cmdwait 60000 speak text “Get out of my room !”

If you want to speak the text that is currently in the clipboard, use this:
nircmd.exe speak text ~$clipboard$

If you want that the computer will speak the entire content of a text file, use this:
nircmd.exe speak file “c:\temp\speak1.txt”

Be aware that Windows XP comes with a default “robotic” voice known as “Microsoft Sam”, while Windows Vista provides much better woman voice, known as “Microsoft Anna”.

When you run operating system inside a Virtual PC, the current date/time is automatically taken from the host operating system.
This feature is useful for most cases, but sometimes you may want to run the guest operating system with specific date and time, instead of the current date/time.
You can do that simply by changing the date/time of your computer, but this change will also affect the other programs running in the same machine.

To change only the date/time of the guest operating system, you can use one of the following methods:

  1. Manually change the .vmc file:

    The .vmc files contain the configuration of each virtual machine and are usually located under [User Profile]\My Documents\My Virtual Machines\[Virtual Machine Name]

    You have to make 2 changes in the right .vmc file:

    A. Disable the time synchronization:

    Under the following mouse configuration:
    <mouse>
    <allow type=”boolean”>true</allow>
    </mouse>

    Add this:
    <components>
    <host_time_sync>
    <enabled type=”boolean”>false</enabled>
    </host_time_sync>
    </components>

    B. Set the desired date/time:

    You have to find the time_bytes value inside the .vmc file, which looks like this one:

    <time_bytes type=”bytes”>27003200110001201008</time_bytes>

    After finding it, set the desired date/time value according to the following specification:
    Digits 1 – 2 contain the seconds value.
    Digits 5 – 6 contain the minutes value.
    Digits 9 – 10 contain the hours value.
    Digits 15 – 16 contain the day value.
    Digits 17 – 18 contain the month value.
    Digits 19 – 20 contain the year value.

    In the above example, the date/time value is 11:32:27, 20/10/2008

    After making the above 2 changes, save the .vmc file, and the guest operating system will start in the same date/time that you set in the time_bytes value.

  2. By using RunAsDate utility:

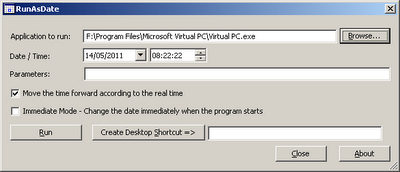
    In order to use this method, download and run the RunAsDate utility, choose the desired date/time, and select the path of the Virtual PC application, (It should be something like C:\Program Files\Microsoft Virtual PC\Virtual PC.exe) and then click the ‘Run’ button to start running the Virtual PC application. If Virtual PC is already running in your computer, you should close it before starting the new one.

    When you run the Virtual PC application within RunAsDate utility, all the guest operating systems that you run from it will automatically use the date/time that you set with RunAsDate utility, instead of the real date/time of your computer.

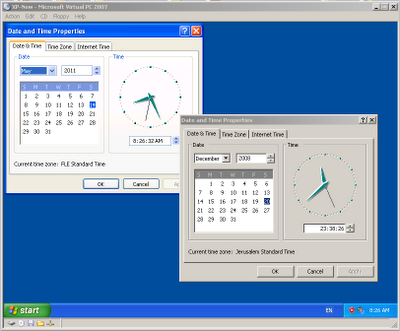
If you successfully used one of the above methods, you should have a running guest operating system with the date/time that you chose, while the computer’s date/time continues to run normally:

The new version of WirelessKeyView now allows you to recover your wireless network keys from external instance of Windows XP operating system (Vista is not supported yet). This feature can be useful if you have a dead system that cannot boot anymore.
You can use this feature from the user-interface, by using the ‘Advanced Options’ in the File
menu, or from command-line, by using the /external parameter.