Notice:  The latest version of NirLauncher package is now available at http://launcher.nirsoft.net/

4 weeks after the first Beta release of NirLauncher utilities package, a new release is now available to download. If it’s the first time that you read about this package, it’s recommended that you also read the release notes of the first NirLauncher release, here.

The following changes were made in this release:

  • Fixed bug: NirLauncher failed to execute console application when the path contained spaces.
  • NirLauncher.exe is now on the root folder, while the NirSoft utilities are under NirSoft folder. Be aware that you must extract the package with the same folder names in the zip file. Otherwise, it won’t work.
  • Added autorun.inf in the root folder that allows you to automatically open NirLauncher when you plug the USB flash drive. (Doesn’t work on Windows 7, because Microsoft removed this feature)
  • Added ‘All Utilities’ tab that show all utilities in one list.
  • sysinternals2.nlp is now available with full URLs, thanks to the great work of Yair from the comment in the first Beta post. Also, added ‘All Sysinternals Tools’ tab.
  • Add Next/Previous Package buttons.
  • Added option to add a tray Icon (Disabled by default).
  • The new utility, DevManView, added to the package.

Download the second Beta of NirLauncher package with more than 100 utilities

Zip File Information:  (to verify that the downloaded file is Ok)

MD5: a617cfa78c138c340ec99de6f5d63903
SHA1: fa0a8fab272289edeede32d190b4c0862216b0cb
File Size: 6,812,717
Number of files in the Zip: 246

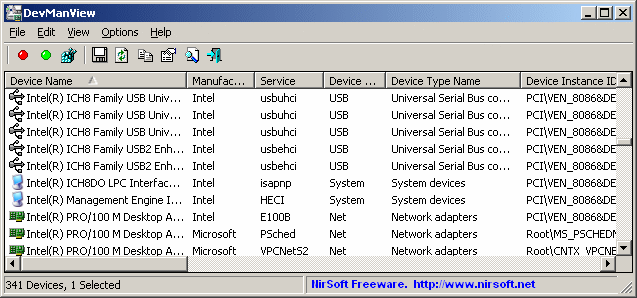
DevManView is a new utility that displays the list of all devices in your system, and allows you to disable/uninstall an obsolete device that is not needed anymore.
As opposed to the Device Manager module of Windows, which displays the devices list in a tree and requires you to open the properties window in order to get more information about the device,  DevManView displays the devices list in a flat table with all major device properties.

In addition to retrieving the devices list of your local computer, DevManView also allows you to get the devices list of remote computer on your network and from the Registry file of external instance of Windows.

DevManView

DevManView

For more information about DevManView utility, click here.

Some of NirSoft utilities like ServiWin, ProduKey, USBDeview, MyEventViewer, RegScannerNirCmd, and DevManView (a new device manager utility that will be released soon) allows you to connect a remote computer on your network and get the same result as you use it in the local computer.  In order to use this remote computer feature, you must have full administrator access to the remote computer.

Even if you have the admin user name and password of the remote machine that you wish to connect, you still have to configure it properly in order to get full  administrator access.
If you have a network with a domain controller, and you are the administrator of this domain, your life is a little easier, because some of configuration changes required to get admin access remotely are made by Windows automatically when the computer joins the domain.

Here’s a list of security configuration changes that you have to do in the remote machine, in order to get the administrator access remotely:

1.  Configure your Firewall. Depending on  the firewall that you use on the remote computer, you may need to change the firewall configuration in order to be able to connect the computer.
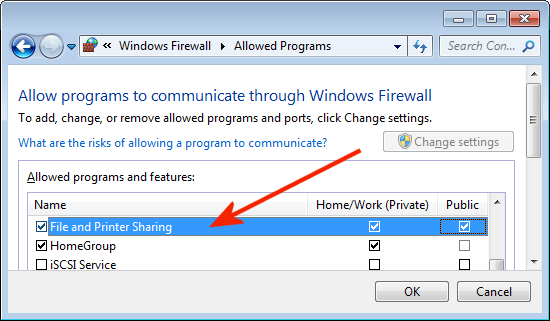
If you use the Windows firewall,you should go to ‘Allow Programs’/Exceptions section and verify that the ‘File And Printer Sharing’ option is checked.’

Enable 'File And Printer Sharing' in Windows Firewall

Enable 'File And Printer Sharing' in Windows Firewall

If you have another Firewall that filter the traffic by port numbers, you should configure it to accept incoming TCP/UDP packets with ports 135-139.
Warning: On your router that connect you to the Internet, you must verify that it’s not configure to forward ports 135-139 from the Internet into your machine. If the router is configured this way, your computer is in high risk of being penetrated by hackers and Trojans.

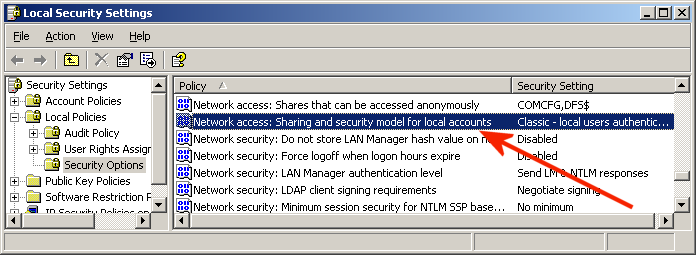
2. Change network security and sharing mode to classic:  On Windows XP, the default network sharing mode is ‘Guest Only’, which means that even if you log-on remotely as admin user, you’ll only get the access rights of regular user. In order to change this mode, go to the ‘Local Security Settings’ in Administrative Tools of Control Panel, and under Local Policies->Security Options, find the option of ‘Network and security model for local accounts’ and change it to classic mode.

Sharing and security model

Sharing and security model

Alternatively, you can change the following Registry value to get the same effect:
Windows Registry Editor Version 5.00
[HKEY_LOCAL_MACHINE\SYSTEM\CurrentControlSet\Control\Lsa]
“forceguest”=dword:00000000

3.  Turn off the Remote User Account Control in Windows Vista and Windows 7:
By default, the User Account Control component of Windows 7/Vista doesn’t allow to get administrator access on a remote machine. In order to turn off this restriction, you should set the following Registry value:
Windows Registry Editor Version 5.00
[HKEY_LOCAL_MACHINE\SOFTWARE\Microsoft\Windows\CurrentVersion\Policies\System]
“LocalAccountTokenFilterPolicy”=dword:00000001

For more information about this Registry value, read here.

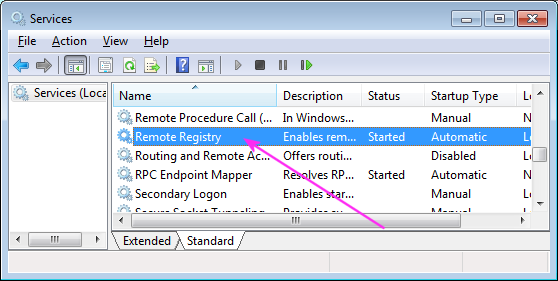
4. Starting the ‘Remote Registry’ service. Some of NirSoft utilities, like ProduKey and USBDeview, get the data from the remote machine by reading it from the Registry database.  On Windows 7/Vista, the ‘Remote Registry’ service is not started automatically by default,  so you have to start it in order allow these utilities to work on the remote machine.
You can start this service by using the Services module in Administrative Tools of Windows or by using the ServiWin utility of NirSoft.

Remote Registry Service

Remote Registry Service

5. Connecting the remote machine. After making the above changes, you should be able to connect the remote machine and get full admin rights.
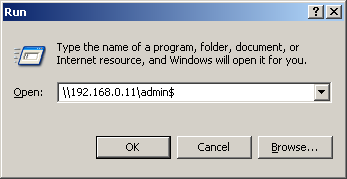
You can connect the remote machine by typing a path of admin share in the ‘Run’ text-box of Windows, for example:
\\192.168.0.11\c$
\\192.168.0.12\admin$
\\MyComp01\admin$

After a few seconds, Windows will ask you to type the user name and password for connecting the remote machine.

Connect the admin share of remote computer

Connect the admin share of remote computer

You can also connect the machine by using the ‘Net Use’ command, for example:
net use \\192.168.0.15 “MyPassword” /user:”MyPC\admin”

After connecting the remote machine, you’ll also be able to connect it with all NirSoft utilities that have the remote computer feature.

Due to severe network issue on the data center that my server is located, all NirSoft Web sites were down for more than an hour.  NirSoft is now back online again and everything is Ok.

Just a week ago, I released the first Beta of NirLauncher package to download from this Blog.  For the beginning, I deliberately released this package quietly only in my Blog, and added some download restrictions, because this package is relatively large, and I wanted to make sure that my server won’t be overloaded by large amount of users that download this package in the same time.  even with this “quiet” release and these download restrictions, I still got a large peak of users that downloaded the Beta release of NirLauncher.

A day after I released this package, it was published in lifehacker and other well-known Web sites, which caused a large visitors peak that I had never seen before. At some point, my server load was pretty high, due to large amount of users that downloaded this package concurrently.

The users pick that I got after the NirLauncher release can be easily seen in the site statistics of Google Analitics.  On October 5th, the number of unique visitors reached to nearly 50,000,  which is around 40% more than a usual day.

NirLauncher release in Google Analitics.

NirLauncher release in Google Analitics.

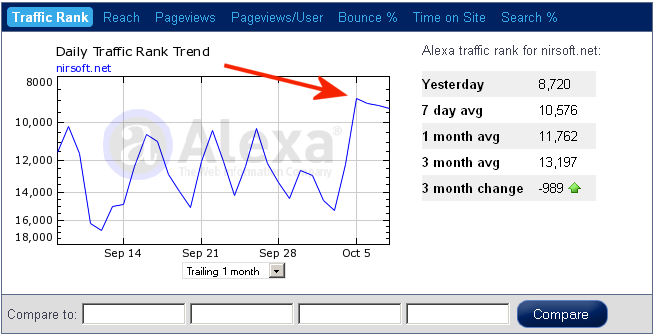
On alexa Web site, you can also see the visitors peak after NirLauncher release, but the visitors peak is not sharp as in Google Analitics, because there are other peaks appeared during september, from unknown reason. Obviously, Google Analitics is more accurate than Alexa, because Alexa only counts the visitors with Alexa toolbar, while Google Analitics counts all visitors with JavaScript enabled Web browser.

NirLauncher release in Alexa

NirLauncher release in Alexa

Another impressive result from NirLauncher release is the number of remarks in the release post (currently 55), which is quite nice relatively to my inactive Blog.  Be aware that I haven’t had time yet to read all yours remarks deeply, but I’ll certainly consider them in further NirLauncher releases.

Notice:  The latest version of NirLauncher package is now available at http://launcher.nirsoft.net/

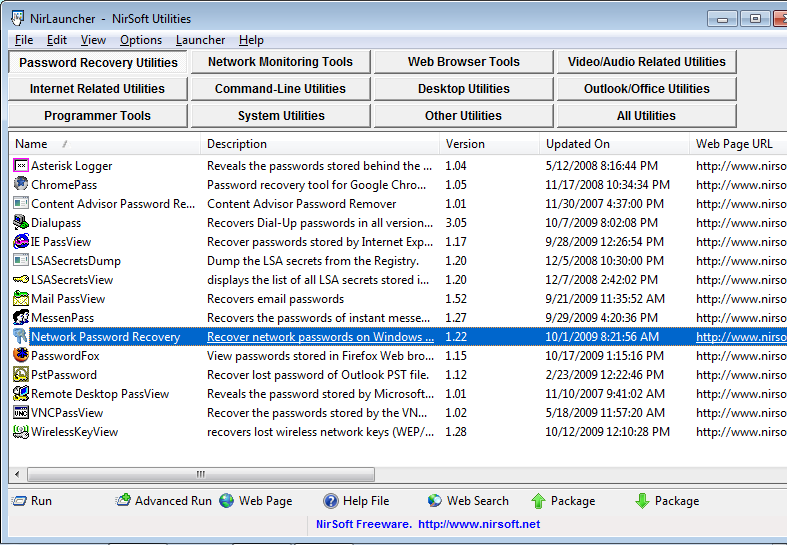
As I promised a few weeks ago, the Beta version of NirLauncher, with a package of more than 100 utilities of NirSoft, is available to download.

NirLauncher Screenshot

NirLauncher Screenshot

Before you go to the download link, it’s important that you read the following guidelines:

  • For now, the download link of this utilities package is a little restrictive. I only allow to download it 5 times per day for each IP address. So please don’t download this package with any ‘download accelerator’ software that open multiple connections. If you do so, the download might be failed and your IP address will be blocked from downloading this file for a few hours.
    Also, the download link won’t work if you put it on  other Web sites.
    I’ll try to gradually reduce these restrictions as long as it won’t eat my server resources.
  • Antivirus False Positives – This package contains more than 100 utilities, and if you have any Antivirus on your computer, there is a very high chance that it’ll falsely detect one or more of these utilities as Virus/Trojan/Spyware/Malware or anything else.
    It’s also possible that your Antivirus will simply delete some of the utilities or prevent you from running them without displaying any alert.
    In any case, please don’t flood my email address with messages like “You have virus in your utilities package”   or “After I extract your files, some of them are deleted” or “I double-click xyz utility and nothing happens”.  All complaints about false virus alerts, utilities that cannot be executed, and disappearing files should be sent to the Antivirus companies that cause these troubles.
    You are also welcomed to read my Blog post from a few months ago: Antivirus companies cause a big headache to small developers.
  • You might find out that some of my utilities in this package are missing. For now, to avoid from including very old utilities, my scripts that build the NirLauncher package automatically take only utilities that have been updated in the last 1000 days.  Some of my very old utilities might still save the settings into the Registry, and I don’t want to include them in NirLauncher package, because this package should be fully portable.
    Later, I’ll gradually check my old utilities and some of them will be possibly upgraded to be included in future releases of NirLauncher package.
  • Currently, the software groups (categories) in NirLauncher are not the best choice, I simply took them with automatic scripts from my main utilities page. I hope that I’ll create better software groups in future versions.
  • Start using NirLauncher:  In order to start using NirLauncher, simply create a new folder in your USB flash drive or in any other drive, and then extract all files of the package into the new folder.
    You should not extract the files into the root directory of your USB flash drive, because the package contains too much files.
    After you extracted the package, simply run the NirLauncher.exe executable.
  • After running NirLauncher, here’s some tips for using it:
    • You can use F7 and F8 keys to move to the next and previous software group.
    • When you select a single item, the ‘Description’ and ‘Web Page URL’  become a link that you can click. Clicking the ‘Description’ opens the help file,  and clicking the ‘Web Page URL’ opens the right utility Web page. If you are not pleased from this feature, you can disable it from Options->Advanced Options (set all click options to none)
    • If you want to view a longer description of each utility that you select, check the ‘Show Description Text’ under the options menu. However, be aware that these description texts were taken from the pad files of my utilities, and they are not always updated to the latest features of each utility.
    • If you want to run a utility with command-line parameters, change the current directory, and so on, the ‘Advanced Run’ is the right option that you need.
    • There is also a generic ‘Advanced Run’ window that affects all utilities that you execute with the standard ‘run’ option: Options -> Default Run Settings. For example, if you open the ‘Default Run Settings’ window and select the ‘Run in full screen mode’ option, all console application that you run will be opened in full screen.
    • If you use the x64 version of Windows, and you click on a utility that have a separated x64 version, NirLauncher automatically run the x64 executable of the utility. The x64 executable filenames  in the package are in UtilityName-x64.exe format.
  • Warning for Windows 7/Vista users: For now, do not run NirLauncher.exe with ‘Run As Administrator’ option.  It seems that using this option cause my ‘Network Password Recovery’ utility and a few others to crash lsass.exe process if you run them from NirLauncher that was executed with ‘Run As Administrator’ option. The reason for this problem is still unknown, and more research is required to fix it.
    If you want to force a specific utility to run with admin permissions, simply use the ‘Run As Administrator’ option (Ctrl+M) inside NirLauncher.

Here’s a few optional tips for more advanced users. If you don’t need them, you can skip to the download link in the bottom of the post.

  • The package contains a file named ‘nirsoft.nlp’ (NLP = NirLauncher Package) . This file contains the list of all software groups and utilities that are displayed in NirLauncher.  It’s a very simple text file, like .ini file of Windows, that you can easily view and edit with any text editor. So, although the current version of  NirLauncher doesn’t support editing, you can change the software groups and utilities list displayed in NirLauncher by editing this file.
  • When editing the .nlp file, it’s recommended that any file that you specify will be in relative path. For example: if you want to add an executable file located in a subfolder named ‘MyPackage’ under the main launcher folder, you should specify it as ‘MyPackage\myfile.exe’ instead of ‘i:\nirsoft\MyPackage\myfile.exe’.
  • The ‘help’ value in .nlp file specifies that help file (.hlp or .chm). However, if the help filename has the same name of the executable (like cports.exe and cports.chm), NirLauncher will detect it automatically.
  • The ‘AppName’  value specifies the application name, while the ‘ShortDesc’ value specifies a short description.  If you don’t specify these values, NirLauncher will take them from the version resource of the .exe file.
  • The ‘LongDesc’ value is the text that appeared in the yellow description box of ‘Show Description Text’ option.
  • NirLauncher also allows you to add additional software packages. Just for example, here’s how to add Sysinternals Suite into NirLauncher:
    1. Go to Sysinternals Suite Web page, and download the latest zip file.
    2. Extract the zip package of Sysinternals into a new folder located in the same drive of NirLauncher.
    3. Download the sysinternals.nlp that I created for Sysinternals Suite, and save it into the same folder with all Sysinternals files.
    4. Drag this sysinternals.nlp into the main window of NirLauncher. You can also use the “Add Software Package” from the Launcher menu.
    5. If you did it right, you should now see the Sysinternals package in the main window of NirLauncher. You can switch between the packages by using F3 and F4 keys.
    6. You may notice that full description text and Web Page URL are empty. This is because they are not filled in the sysinternals.nlp that I created.
      However, the ‘Open Web Page’  option (Ctrl+W) will still work properly for most of the SysInternals utilities even without the URL information, thanks to the “I’m feeling lucky” feature of Google. When there is no URL, I simply send the utility name to Google, and the first page in the search result is automatically opened.

Finally, here’s the download link:

Download NirLauncher package with more than 100 utilities

Zip File Information:  (to verify that the downloaded file is Ok)
MD5: b18f2706b2737128a9f7fd01648f5e38
SHA1: 353bd70b747dc73f58daec120df25a23330d0545
Size: 6,685,806 bytes
Number of files in the Zip: 241

There are many users that already have a computer with processor that supports the  x64 architecture and some of them probably consider to move into the new world of 64-bit and install the x64 version of Windows.
if you’re one of these users, you should read the following tips before doing any step:

  1. First, let’s start with the good part:  The x64 version of Windows have an emulation known as “WOW64” which allows you to install, run and use almost every existing 32-bit application that you currently use in your 32-bit version of Windows.  I said the word ‘almost’ because there are some exceptions that will be explained in the next clauses.
  2. Device Drivers:  As opposed to applications, 32-bit drivers cannot be used under x64 version of Windows. This means that must have the appropriate 64-bit driver for every hardware product that you want to use.  For standard hardware products like simple mouse and keyboard, you don’t have to worry,  because Windows x64 already packed with the right drivers.  But if you use some uncommon hardware devices, you should check if the manufacturer of these devices provide x64 drivers for these devices.
  3. There are some applications that load and use one or more drivers that are needed for their functionality.  Just for example: Process Explorer and some other tools of SysInternals load their own driver that is used to extract information from Windows Kernel.
    These kind of tools won’t work under x64 system, unless the software developer  provide the software with the appropriate 64-bit driver. In the case of  SysInternals tools, there is no problem, because these tools are shipped with both 32-bit and x64 drivers, and the right driver is loaded according to the version of Windows.
    However, there are some software developers that only provide a driver for 32-bit, and thus their software won’t work under x64.
  4. Starting from x64 version of Windows Vista, Microsoft added a security feature that many people don’t know about:  Every driver that is loaded into Windows Kernel must be digitally signed. Signing a driver can only be done by a commercial entity and requires also to pay hundred of $ per year for the Commercial Software Publisher Certificate.
    Microsoft added this feature in order to prevent from malware/Viruses/Trojans creators from loading and running malicious code inside the Windows kernel. Unfortunately, they also blocked many legitimate small developers from porting their driver based application into 64-bit.
    One example is my own OpenedFilesView utility. This utility uses a small device driver for extracting information about the opened file handles stored in the Windows kernel. (There is no any other way to get this information)
    Due to above Kernel changes in Vista x64, I cannot port this utility into Windows x64.  I already had some users that moved  from 32-bit to x64 system and disappointed after they found out that they would not  be able to use my  OpenedFilesView utility in their new x64 system.
    In theory, I can open a real company with office, phone, and address, purchase a Commercial Software Publisher Certificate, do the entire process of signing my driver, and then sell the x64 version of OpenedFilesView for $10-$15. However, I don’t think that the sells of this software will cover the costs of maintaining a company and Certificate payments.
  5. There are  some applications that inject a dll file into other programs  (Windows Hooks) in order to interact with their user interface or to grab some information from them. For example, My Volumouse utility change the mouse wheel behavior when the focus is on other applications, and thus it inject a special dll for every application that interact with the mouse wheel.
    When you run this kind of application on x64 system, it’ll probably work well with other 32-bit application, but it won’t be able to interact with other x64 applications, unless the software developer added a support for x64 systems.
  6. Windows Registry on x64 version of Windows is a little confusing: Some of the Registry keys are common for both 32-bit and x64 applications, while some Registry keys have 2 separated instances – one for  32-bit applications and one of 64-bit applications. The separated keys for 32-bit applications are stored under HKEY_LOCAL_MACHINE\Software\Wow6432Node and HKEY_CURRENT_USER\Software\Wow6432Node.
  7. On x64 system, every memory address,  file handle, window handle, and other kernel objects, consume 8 bytes in memory (64-bit = 8 bytes), while on 32-bit systems, only 4 bytes are used. This means doing the same work on x64 might consume much more memory than on 32-bit system, even when in many cases, the usage of 8 bytes is not really necessary.
  8. Many applications vendors still don’t provide a separated 64-bit version of their application, and instruct their x64 users to use their 32-bit application. Even if the 32-bit application works perfectly on x64 system, it’s still running on WOW64 emulation, and this means that the application might  be a little slower than on a real 32-bit system.
    However, if the application vendor provide a separated version for x64, running the x64 version of x64 system might give you better performances than using the 32-bit application on 32-bit system.

In some circumstances, you may want to extract the original system files (.dll files, .exe files, and others) that are shipped with the DVD of Windows 7 and Windows Vista.
Whether you need these files because they are missing in your system, or whether these file were replaced by other versions that caused problems, and you want to get back the original Windows files, here’s a simple method to extract these system files from Windows 7/Vista DVD:

  1. Download and install the latest version of  7-Zip File Manager.
  2. Browse into the sources folder of the Windows DVD. For example, if your DVD drive is d:, you should type in the folder path of 7-Zip utility ‘d:\sources’

    Sources Folder in Windows DVD

    Sources Folder in Windows DVD

  3. Locate a file named ‘install.wim’ and double-click it. You can easily find it by clicking the size column header to sort the files list by size, because it’s the largest file on this folder.
    Alternatively, you can simply type ‘d:\sources\install.wim\’ in the path text-box, and jump directly to the content of install.wim.
  4. Wait 5 – 10 seconds (or a little more) until 7-Zip utility read the content of install.wim
    extract_windows_7_files_2
  5. After 7-Zip utility opens the file, you’ll get a few numbered folders. Each numeric subfolder represents a different version of Windows (Starter, Home Basic, and so on).
    In most cases, you can simply browser into any of these folders, because most of system files are identical for all versions.
    However, if you want to be more strict, and extract the files from the folder that represent your current Windows version, you can first extract and read the ‘1.xml’ file, which contains the list of versions stored in these folders.
    To make your life easier, here’s the folder versions list in the DVD of Windows 7 RC:
    1 – Windows 7 Starter
    2 – Windows 7 Home Basic
    3 – Windows 7 Home Premium
    4 – Windows 7 Professional
    5 – Windows 7 Ultimate

    This means that if you want, for example, to browse into the files list of

    Windows 7 Professional, you should double-click the ‘4’ folder.

    install.wim in 7-zip

    install.wim in 7-zip

  6. After entering into the one of the numeric folders, you’ll get a list of base system folders like ‘Program Files’ and Windows. You should now go to the right system folder which contains the files you need. For example, if the files that you’re looking for are usually stored c:\windows\system32, you should browse into Windows\System32 subfolder

    System32 folder inside install.wim

    System32 folder inside install.wim

  7. Select the files that you want to extract, and then click the ‘extract’ button. 7-Zip utility will ask you to type the destination folder to copy the files. After you choose or type the desired destination folder, click the ‘Ok’ button, and the files you need will be extracted to the selected folder.
    extract_windows_7_files_4

Finally, if you are an expert user that want to do the same thing from command-line, here’s a small example that shows you how to do it:

“C:\Program Files\7-Zip\7z.exe” e d:\sources\install.wim -oc:\temp 2\windows\system32\shell32.dll

In the above example, shell32.dll is extracted from the installation files of Windows 7 Home Basic (Folder 2) into c:\temp folder, assuming that d:\ contains the Windows 7 DVD and 7-Zip utility is installed on C:\Program Files\7-Zip.

If you constantly work with NirSoft utilities, you probably already know that most of these utilities allows you to save the data into text, csv, html, or xml file from command-line, without displaying any user interface.

However, until now there was one drawback in this feature: The data was always saved in the original order, without any sorting.
So I finally started to add the command-line sorting feature into my utilities. I already added this sorting feature to the following 7 utilities, and I’ll gradually add it also to the others:  IECacheView, MozillaCacheView, CurrPorts, LiveContactsView, MyLastSearch, SearchMyFiles, and OpenedFilesView.

Here’s a few points about using this sorting feature:

  • For every utility that this feature is added, the data that you save from command-line will be sorted according to the last sorting that you chose from the user interface, by clicking the column header. If from some reason you still want to save the data without any sorting, like in the previous versions, you can still do that by using /nosort option, for example:
    IECacheView.exe /shtml c:\temp\iec.html /nosort
  • If you want to sort the saved data by another column, you can use the /sort command-line option. This option can accept a number as column index (0 for the first column, 1 for the second one, and so on) or the field name as appeared in the column header.
  • For example, if you want to sort by the first column (in the current columns order):
    IECacheView.exe /shtml c:\temp\iec.html /sort 0
  • If you want to sort in descending order, you should add ‘~’ character as prefix.  For example, to sort the third column in descending order:
    IECacheView.exe /shtml c:\temp\iec.html /sort ~2
  • You can also sort by more than one column, simply by specifying multiple /sort parameters. For example: to sort by the second column, and then by the first column in descending order:
    IECacheView.exe /shtml c:\temp\iec.html /sort 1 /sort ~0
  • If you choose the specify the sorting column by its name, you must put it in quotes if the caption contains one or more space characters. For example, to sort by Content Type in IECacheView:
    IECacheView.exe /shtml c:\temp\iec.html /sort “Content Type”
  • If you want to sort in descending order, the ‘~’ prefix must be inside the quotes, for example:
    IECacheView.exe /shtml c:\temp\iec.html /sort “~Content Type”
  • You don’t have the type the exact column name. Even if you write a partial name of the column, my utilities will locate the right column. For example, if you want to sort by the ‘Last Modified’ column, you can specify only ‘Modified’ as column name:
    IECacheView.exe /shtml c:\temp\iec.html /sort “Modified”

Notice: In all examples  specified above, I used IECacheView utility to demonstrate the command-line sorting feature.  However, you can use this feature in the same manner for all utilities that I add the sorting option.

The new version of BlueScreenView (v1.10)  provides a few command-line options that allows you to choose the desired MiniDump folder and to save the MiniDump crashes list into  text/html/xml/csv file, without displaying any user interface.

Here’s the list of all changes in version 1.10:

  • Added accelerator keys for allowing you to toggle between modes more easily.
  • Added command-line options for saving the crash dumps list to text/csv/html/xml file.
  • Added command-line option for opening BlueScreenView with the desired MiniDump folder.
  • Fixed focus problems when opening the ‘Advanced Options’ window.
  • Added ‘default’ button to the ‘Advanced Options’ window.
  • Added ‘processor’ column – 32-bit or x64.

This new version of BlueScreenView is available in this page.