Archive for the ‘Utilities Update’ Category

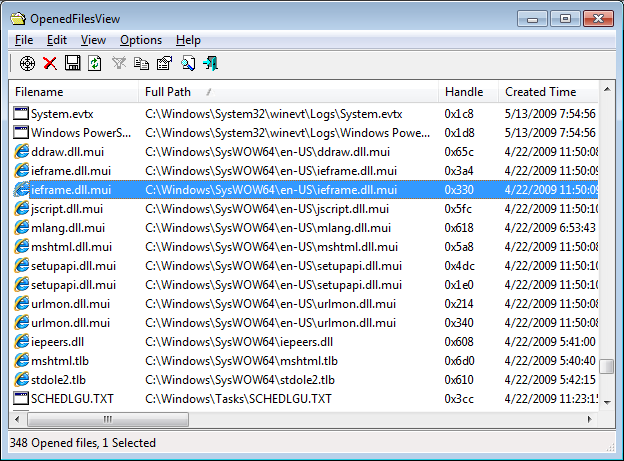
A few months ago, I posted some information about moving to x64 system and explained the problem with creating 64-bit version of OpenedFilesView.
A few users that read my Blog post suggested that I use the trick described in the following  article:  Solving 64-Bit Windows’ “I Only Want Signed Drivers!” Tantrums.
After checking this method, I found out that some information in this article is inaccurate, but in the end I managed to get it work. First, this article suggest to use ‘bcdedit /set testsigning on’ command in order to turn on the mode that allows to load drivers that are not signed by Microsoft. However, this article doesn’t mention that this command takes effect only after system restart.  Also, this article says that I must install the certificate on the computer that I want to load the driver. In fact, I found out that I can load my driver even without installing the certificate, as long as I sign my driver with my dummy signature, and the driver signing test mode is turned on.

Although many users may not want to turn on the driver signing test mode just to use my OpenedFilesView utility, I decided to create unofficial release of OpenFilesView/x64 that can be used when the test mode is on. I also added a few lines of code that automatically offer the user to turn on this test mode when the driver cannot be loaded.

You can download the x64 release of OpenedFilesView from here.

In the first time that you try to run it, OpenedFilesView will ask you if you want to turn on the driver test mode. If you choose ‘Yes’, you’ll have to manually reboot your system in order to start using OpenedFilesView.  After reboot, your system will be loaded in test mode, which allows OpenedFilesView to load the driver and work properly.

Be aware that Windows continue to work in this test mode even after reboot. If you want to turn off this test mode, you can choose ‘Help->Turn Off Test Mode’  in the menu bar of  OpenedFilesView, and then restart the computer.

OpenedFilesView in Windows 7/x64

OpenedFilesView in Windows 7/x64

Each time that you run an application in your system, a Prefetch file (.pf file) which contains information about the files loaded by the application, is created by Windows operating system. The information in the Prefetch file is used for optimizing the loading time of the application in the next time that you run it. These Prefetch files are stored in C:\Windows\Prefetch, starting from Windows XP.
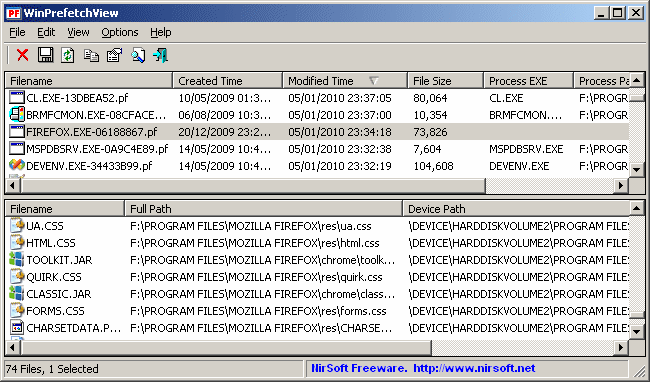
WinPrefetchView is a new utility that allows you to easily watch the content of these .pf files.  By looking in these files, you can learn which files every application is using, and which files are loaded on Windows boot.

For more information about this new utility, click here.

WinPrefetchView

WinPrefetchView

The new version of SearchMyFiles utility provide a new search mode that allows you to easily find duplicate files in your system.  When you switch to the new ‘Duplicates Search’ mode, SearchMyFiles scans the files according to your preferences, like it does in the regular mode, but instead of displaying the list of all files, it only displays the files with identical content.

In order to start using the duplicates search, simply set the Search Mode combo-box in the search options window to ‘Duplicates Search’. It’s also highly recommended to narrow the search by setting time, size or subfolder depth restrictions, because if don’t set additional restrictions, the duplicate search might be very slow.

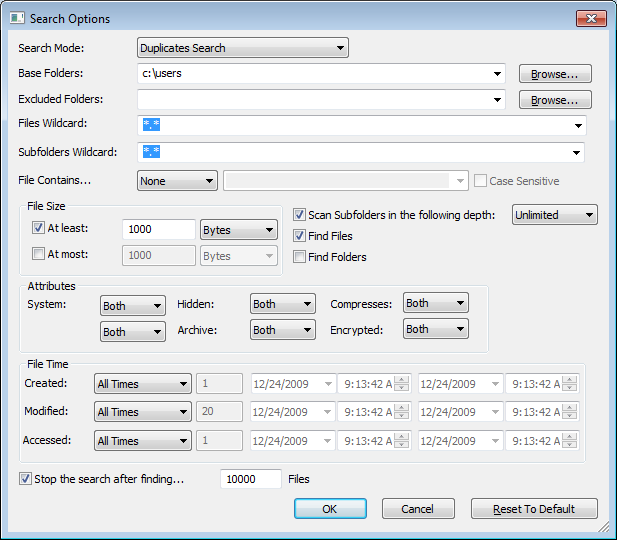
In the following example (in the screenshot), SearchMyFiles was configured to search for duplicate files under c:\users but only for files that their size is greater than 1000 bytes:

Duplicate Search Options

Duplicate Search Options

During the duplicate search, there are 2 stages. In the first stage, SearchMyFiles scans all files and folders according to your selection, but without adding any file to the main window.  The scan in the first stage is only made for collecting the files list, but without reading the files. In the second stage, SearchMyFiles compare all files with equal size, and when it find 2 or more files with identical content, they are added to the duplicates list in the main window.

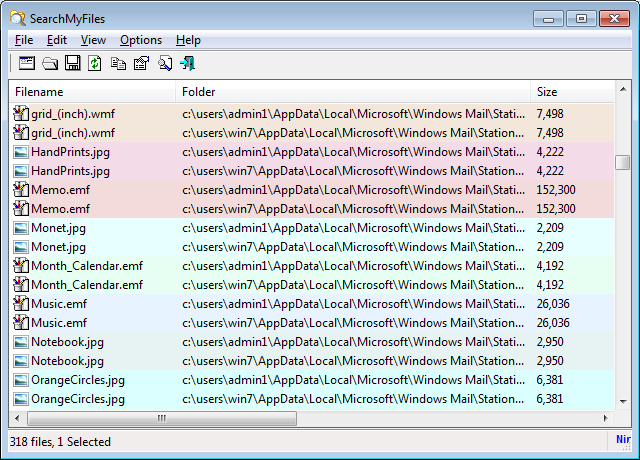
After the scan is finished, the duplicates list looks like in the following screenshot:

Duplicates Search Result

Duplicates Search Result

Each chunk of duplicates files are painted with different color (There are up to 64 different colors) and there is also a ‘Duplicate Number’ column, which allows you to easily sort the list according to the duplicates order.

You can find the latest version of SearchMyFiles utility here.

2010 is almost here, so it’s time to announce about 10 new utilities that will be added to NirSoft collection in the incoming months.  8 of these utilities are already in advanced development state, while the other 2 utilities are only in ‘planned’ state, and it’s still possible that I’ll replace them with other ideas.

The first utility, FlashCookiesView, will be released in the incoming week, and the others will be gradually released in the first quarter of 2010.

Here’s the list of the new utilities, 8 of them with screenshots:

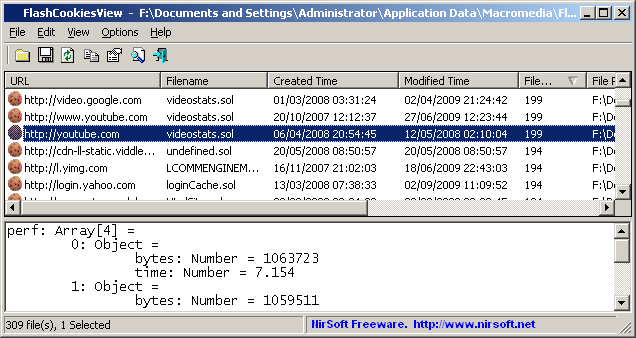
  1. FlashCookiesView: Just like it sounds, this utility displays the list of cookies files and their content, created by Flash component in your Web browser. The first version won’t allow you to edit the cookies, but it’s possible that this feature will be added in the future.

    FlashCookiesView

    FlashCookiesView

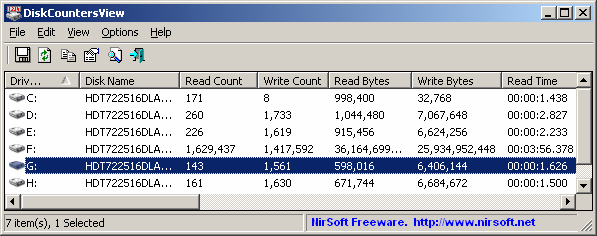
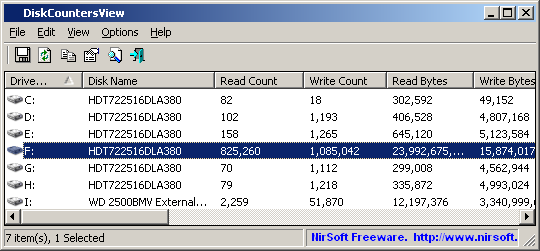
  2. DiskCountersView: This utility displays the system counters of each disk drive in your system, including the total number of read/write operations and the total number of read/write bytes. It also displays general drive information, like disk name, partition number, partition location, and so on.

    DiskCountersView

    DiskCountersView

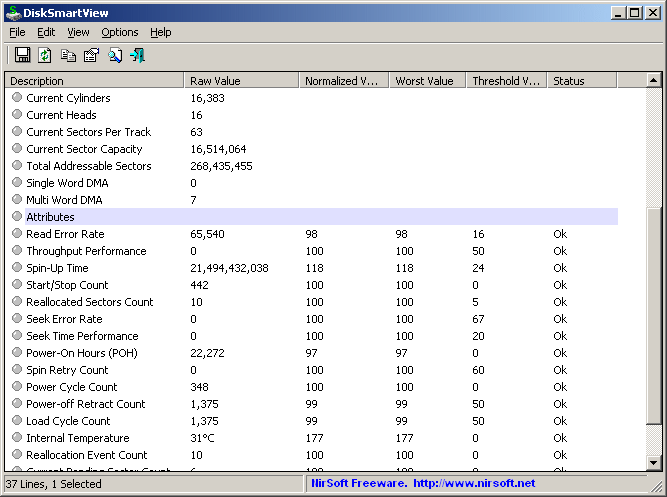
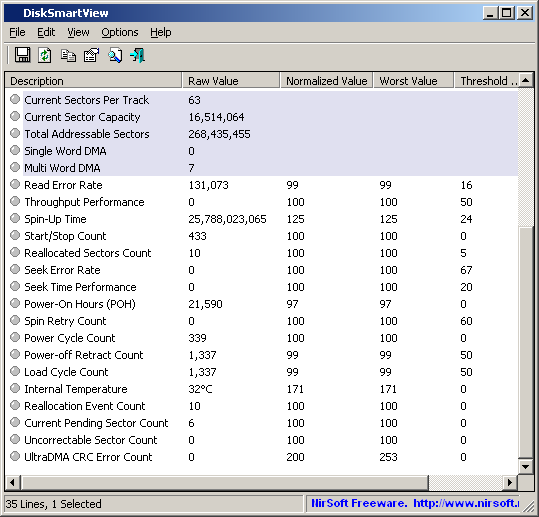
  3. DiskSmartView:  This utility displays the S.M.A.R.T information extracted from IDE disks.  This information can be used to detect problems in the hard-disk.

    DiskSmartView

    DiskSmartView

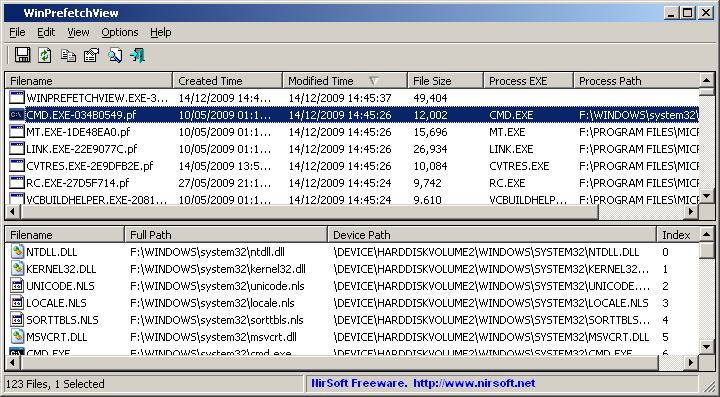
  4. WinPrefetchView: Each time that you run an executable file in your system, Windows creates a Prefetch file (.pf extension) under C:\windows\Prefetch, which stores information about which files this application use, so in the next time, Windows will be able to optimize the  application loading process. WinPrefetchView utility allows you to view the content of these .pf files, which generally shows you the list of files that the application used.

    WinPrefetchView

    WinPrefetchView

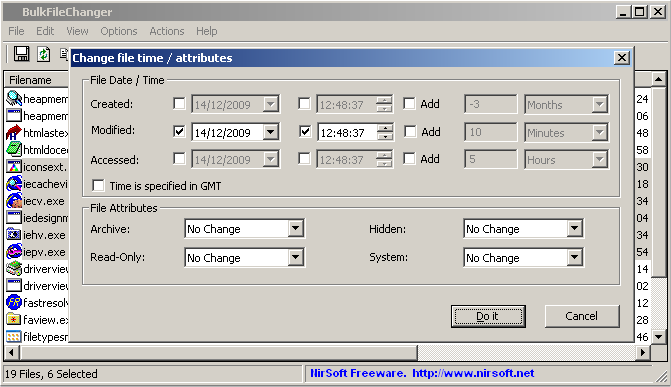
  5. BulkFileChanger: This utility is the successor of my very old ‘FileDateChanger’ utility. It’ll allow you to add multiple files from multiple folders (by wildcard, by drag & drop, and so on) to the list, and then make some operation on all of them at once, including: date/time change, attribute change, copy/paste, cut/paste, and maybe rename too.

    BulkFileChanger

    BulkFileChanger

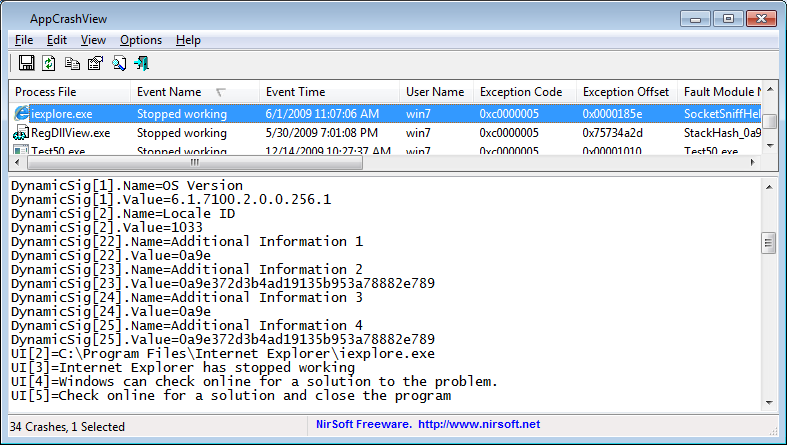
  6. AppCrashView: On Windows 7 /Vista, every time that application is crashed, a .wer file is created, which contains the information about the crash. This utility will allow you to easily watch the content of these .wer files.

    AppCrashView

    AppCrashView

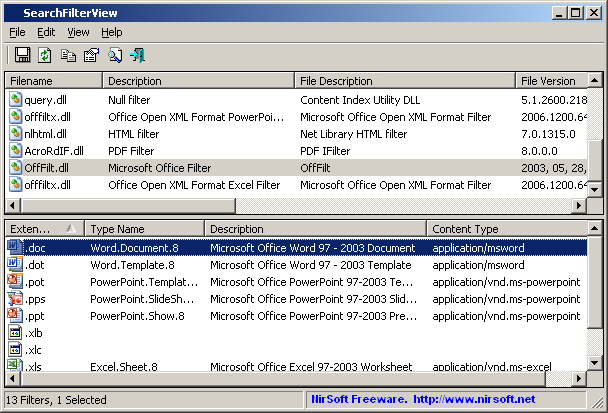
  7. SearchFilterView: When you search the content of files with Windows search, it uses the right search IFilter plugin according to the file extension. This utility allows you to easily view the search filters installed on your system, as well as to add/remote extensions associated with these filters.

    SearchFilterView

    SearchFilterView

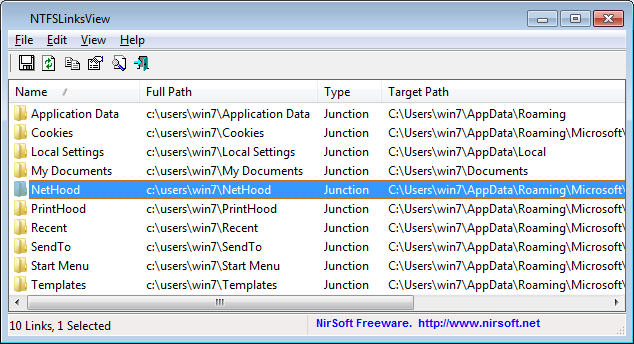
  8. NTFSLinksView: Starting from Windows Vista, Microsoft use symbolic links and junction points of NTFS file system in order to make changes in the folders structure of Windows and keep the compatibility of applications written for older versions of Windows.
    This utility simply shows you to list of all symbolic links and junctions in the specified folder, and their target paths.

    NTFSLinksView

    NTFSLinksView

  9. WakeMeOnLan: This utility will collect information about IP addresses and their associated MAC addresses on your LAN, and when you need it, it’ll allow you to send Wake-on-LAN packet to the desired computers in order to turn on these computers.
  10. OperaPassView: Just like it sounds, a utility to recover the passwords stored by Opera Web browser.

Notice:  The latest version of NirLauncher package is now available at http://launcher.nirsoft.net/

Many people ask me to add ‘Auto Update’ feature that will automatically update the latest version of all NirSoft utilities and the NirLauncher itself.  So I’ll eventually add this feature in one way or another, but the first step is to create an official download page of NirLauncher package that will be updated with the latest utilities every week or every 2 weeks. I hope that the official download page will be available in the incoming weeks.

For now, there is a new Beta download of NirLauncher package, with the following changes:

  • Fixed the missing icons problem in Windows 7/x64.
  • Added packages menu to choose a package.  A package can also be selected from accelerator keys (Ctrl+1 for the first package, Ctrl+2 for the second package, and so on…)
  • Added status bar information.
  • Fixed the crash problems that occurred in some utilities on Windows 7/Vista, when running  NirLauncher as administrator.  This problem occurred only because the executable of NirLauncher contains the word ‘launch’. You can read more about this problem in this post.
    Here’s a small summary of the problem and the way that I solved it:

    • When any executable contains the word ‘launch’ (in my case, NirLauncher.exe), Windows Vista/7 automatically shim the application, which means that apphelp.dll and AcLayers.DLL are loaded into the process and replace the pointers to Windows API functions inside the export table.
    • When  NirLauncher run a utility, the utility is also shimmed, probably because child applications automatically get the same treatment like the parent application. However, if the utility requires elevation (To run as admin) while NirLauncher was executed without admin rights, the launched utility is not shimmed.
    • Some of NirSoft utilities –  ‘Network  Password Recovery’, LSASecretsView, and LSASecretsDump use some code injection technique in order to extract the system data. These utilities use the API function addresses returned  by GetProcAddress function to execute the desired code in a system process. But… when an application is shimmed,  GetProcAddress function returns the addresses of the shim layer instead of the real kernel addresses. These wrong addresses caused the system process to crash immediately and restart the system after a minute.
    • The easiest solution for this problem is to change the executable name of NirLauncher to something else, but this kind of solution is really ridiculous. Also, I cannot assure that Windows won’t shim my application from any other reason.
    • I also tried to add into the executable of NirLauncher and the other utilities a manifest which contains compatibility information. This manifest is a small XML which says to Windows OS: “This application is compatible with Windows Vista and Windows 7, so don’t shim it”.
      Unfortunately, this solution simply didn’t work.
    • The problem was finally solved by making changes in the problematic utilities (NetPass,  LSASecretsView, and LSASecretsDump), so these utilities will work properly even when they are shimmed.  When these utilities detect that they are shimmed, LdrGetProcedureAddress (in ntdll.dll) function is used to get the real address of GetProcAddress function inside the Windows kernel, and in this way, my utilities  bypass the shim layer and get the real kernel addresses.

Update (December 1st, 2009):  Fixed also the Shim issue in MessenPass and WirelessKeyView.

Download the third Beta of NirLauncher package with more than 100 utilities

Zip File Information:  (to verify that the downloaded file is Ok)

MD5: c181e7e46d4acde6f6c9b12309eb85b8
SHA1: 580fcb82d057c8a3cef752124802026886956172
File Size: 6,908,394
Number of files in the Zip: 247

Many users of  SearchMyFiles utility complained that it’s hard to work with this utility, because after getting the search result, it doesn’t allow to do some basic operations on the search result, like deleting files, cut and paste, rename, and so on.
So the new version of SearchMyFiles now allow you to do these basic operations, similarly to the search result of Windows search. Be aware that the context menu of SearchMyFiles still doesn’t provide all options of Windows Explorer context menu, but I gradually improve it in future versions.

Here’s the list of all changes in the new version of SearchMyFiles utility:

  • Added ‘Reset To Default’ button that allows you to easily reset the ‘Search Options’ dialog-box.
  • Added ‘Open File On Double-Click’ option. When this option is checked, double-clicking a file will open it with the default program, like double-click in Explorer.
  • Added new actions that you can make on the selected files of the search result: Explorer Cut, Delete, Move To Recycle Bin, and Rename.
  • In the search option of file times, added ‘Today’ and ‘Since Last Reboot’.
  • Added most-recently-used (MRU) list in combo-boxes of the search dialog-box. SearchMyFiles automatically remembers the last 10 strings that you used for every field, and allows you to easily select them from the Combo-Box. If you don’t want that your last search strings will be saved in the .cfg file (from privacy reasons), you can select the “Don’t Save MRU Lists” option in the Options menu.
  • Fixed the ‘Subfolders Wildcard’ issue according to users request. Just for example: In previous version, if you tried to search in c:\ with abc*.* as subfolders wildcard, and you had a folder in c:\hello\bbbbb\abc123, SearchMyFiles utility didn’t search in this folder even when abc123 folder matched the folder name, and that’s because the folder below, bbbbb, wasn’t match the subfolders wildcard. Starting from this version, SearchMyFiles scan all subfolders, even if they don’t match the wildcard, but the actual file search is only made for subfolders that match the subfolders wildcard.

The new version of SearchMyFiles is available to download from here.

  • ShellExView:
    • On x64 systems, ShellExView now always shows the shell extensions for x64 applications, even on the 32-bit version of ShellExView. If you want to get the shell extensions list for 32-bit applications, use ShellExView with /wow64 command-line option.
    • Added /remote command-line option, which allows you to view/enable/disable shell extensions in a remote computer on your network.
  • MozillaCacheView and ChromeCacheView:
    • Fixed a bug that caused these programs to fail with copy of files from the cache when the filename contained invalid file characters (?, :, *, |, and others).
  • WirelessKeyView:
    • Added ‘Use code injection method’ option in the Advanced Options window, as a workaround for using this utility on Windows 7.
  • USBDeview:
    • Fixed bug: USBDeview displayed wrong drive letters when the serial number or ParentId Prefix contained only one character.
    • Added a separated version for x64 systems, in order to allow you to disable/enable items on x64 systems.
  • MyUninstaller:
    • Added support for x64 installations.
  • OpenedFilesView:
    • /filefilter command-line option now allows you to specify a filename without a path. For example, if you run OpenedFilesView with ‘/filefilter index.dat’, all opened index.dat filenames will be displayed.
  • HashMyFiles:
    • Added ‘Delete Selected Files’ option, which allows you to easily delete duplicated files.
  • FileTypesMan:
    • Fixed issue: When UserChoice is selected, FileTypesMan now displays the right file type properties loaded from the UserChoice application key.
    • Fixed issue: When UserChoice is selected, the ‘Open File Type In RegEdit’ option now opens the right UserChoice application key.

Notice:  The latest version of NirLauncher package is now available at http://launcher.nirsoft.net/

4 weeks after the first Beta release of NirLauncher utilities package, a new release is now available to download. If it’s the first time that you read about this package, it’s recommended that you also read the release notes of the first NirLauncher release, here.

The following changes were made in this release:

  • Fixed bug: NirLauncher failed to execute console application when the path contained spaces.
  • NirLauncher.exe is now on the root folder, while the NirSoft utilities are under NirSoft folder. Be aware that you must extract the package with the same folder names in the zip file. Otherwise, it won’t work.
  • Added autorun.inf in the root folder that allows you to automatically open NirLauncher when you plug the USB flash drive. (Doesn’t work on Windows 7, because Microsoft removed this feature)
  • Added ‘All Utilities’ tab that show all utilities in one list.
  • sysinternals2.nlp is now available with full URLs, thanks to the great work of Yair from the comment in the first Beta post. Also, added ‘All Sysinternals Tools’ tab.
  • Add Next/Previous Package buttons.
  • Added option to add a tray Icon (Disabled by default).
  • The new utility, DevManView, added to the package.

Download the second Beta of NirLauncher package with more than 100 utilities

Zip File Information:  (to verify that the downloaded file is Ok)

MD5: a617cfa78c138c340ec99de6f5d63903
SHA1: fa0a8fab272289edeede32d190b4c0862216b0cb
File Size: 6,812,717
Number of files in the Zip: 246

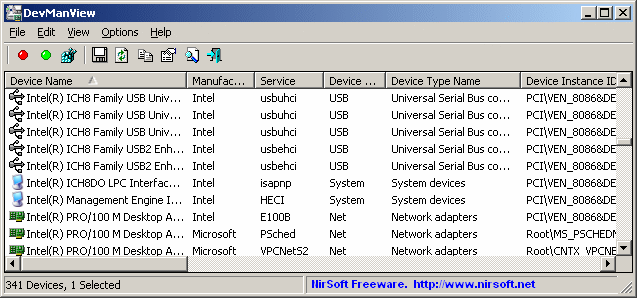
DevManView is a new utility that displays the list of all devices in your system, and allows you to disable/uninstall an obsolete device that is not needed anymore.
As opposed to the Device Manager module of Windows, which displays the devices list in a tree and requires you to open the properties window in order to get more information about the device,  DevManView displays the devices list in a flat table with all major device properties.

In addition to retrieving the devices list of your local computer, DevManView also allows you to get the devices list of remote computer on your network and from the Registry file of external instance of Windows.

DevManView

DevManView

For more information about DevManView utility, click here.

Notice:  The latest version of NirLauncher package is now available at http://launcher.nirsoft.net/

As I promised a few weeks ago, the Beta version of NirLauncher, with a package of more than 100 utilities of NirSoft, is available to download.

NirLauncher Screenshot

NirLauncher Screenshot

Before you go to the download link, it’s important that you read the following guidelines:

  • For now, the download link of this utilities package is a little restrictive. I only allow to download it 5 times per day for each IP address. So please don’t download this package with any ‘download accelerator’ software that open multiple connections. If you do so, the download might be failed and your IP address will be blocked from downloading this file for a few hours.
    Also, the download link won’t work if you put it on  other Web sites.
    I’ll try to gradually reduce these restrictions as long as it won’t eat my server resources.
  • Antivirus False Positives – This package contains more than 100 utilities, and if you have any Antivirus on your computer, there is a very high chance that it’ll falsely detect one or more of these utilities as Virus/Trojan/Spyware/Malware or anything else.
    It’s also possible that your Antivirus will simply delete some of the utilities or prevent you from running them without displaying any alert.
    In any case, please don’t flood my email address with messages like “You have virus in your utilities package”   or “After I extract your files, some of them are deleted” or “I double-click xyz utility and nothing happens”.  All complaints about false virus alerts, utilities that cannot be executed, and disappearing files should be sent to the Antivirus companies that cause these troubles.
    You are also welcomed to read my Blog post from a few months ago: Antivirus companies cause a big headache to small developers.
  • You might find out that some of my utilities in this package are missing. For now, to avoid from including very old utilities, my scripts that build the NirLauncher package automatically take only utilities that have been updated in the last 1000 days.  Some of my very old utilities might still save the settings into the Registry, and I don’t want to include them in NirLauncher package, because this package should be fully portable.
    Later, I’ll gradually check my old utilities and some of them will be possibly upgraded to be included in future releases of NirLauncher package.
  • Currently, the software groups (categories) in NirLauncher are not the best choice, I simply took them with automatic scripts from my main utilities page. I hope that I’ll create better software groups in future versions.
  • Start using NirLauncher:  In order to start using NirLauncher, simply create a new folder in your USB flash drive or in any other drive, and then extract all files of the package into the new folder.
    You should not extract the files into the root directory of your USB flash drive, because the package contains too much files.
    After you extracted the package, simply run the NirLauncher.exe executable.
  • After running NirLauncher, here’s some tips for using it:
    • You can use F7 and F8 keys to move to the next and previous software group.
    • When you select a single item, the ‘Description’ and ‘Web Page URL’  become a link that you can click. Clicking the ‘Description’ opens the help file,  and clicking the ‘Web Page URL’ opens the right utility Web page. If you are not pleased from this feature, you can disable it from Options->Advanced Options (set all click options to none)
    • If you want to view a longer description of each utility that you select, check the ‘Show Description Text’ under the options menu. However, be aware that these description texts were taken from the pad files of my utilities, and they are not always updated to the latest features of each utility.
    • If you want to run a utility with command-line parameters, change the current directory, and so on, the ‘Advanced Run’ is the right option that you need.
    • There is also a generic ‘Advanced Run’ window that affects all utilities that you execute with the standard ‘run’ option: Options -> Default Run Settings. For example, if you open the ‘Default Run Settings’ window and select the ‘Run in full screen mode’ option, all console application that you run will be opened in full screen.
    • If you use the x64 version of Windows, and you click on a utility that have a separated x64 version, NirLauncher automatically run the x64 executable of the utility. The x64 executable filenames  in the package are in UtilityName-x64.exe format.
  • Warning for Windows 7/Vista users: For now, do not run NirLauncher.exe with ‘Run As Administrator’ option.  It seems that using this option cause my ‘Network Password Recovery’ utility and a few others to crash lsass.exe process if you run them from NirLauncher that was executed with ‘Run As Administrator’ option. The reason for this problem is still unknown, and more research is required to fix it.
    If you want to force a specific utility to run with admin permissions, simply use the ‘Run As Administrator’ option (Ctrl+M) inside NirLauncher.

Here’s a few optional tips for more advanced users. If you don’t need them, you can skip to the download link in the bottom of the post.

  • The package contains a file named ‘nirsoft.nlp’ (NLP = NirLauncher Package) . This file contains the list of all software groups and utilities that are displayed in NirLauncher.  It’s a very simple text file, like .ini file of Windows, that you can easily view and edit with any text editor. So, although the current version of  NirLauncher doesn’t support editing, you can change the software groups and utilities list displayed in NirLauncher by editing this file.
  • When editing the .nlp file, it’s recommended that any file that you specify will be in relative path. For example: if you want to add an executable file located in a subfolder named ‘MyPackage’ under the main launcher folder, you should specify it as ‘MyPackage\myfile.exe’ instead of ‘i:\nirsoft\MyPackage\myfile.exe’.
  • The ‘help’ value in .nlp file specifies that help file (.hlp or .chm). However, if the help filename has the same name of the executable (like cports.exe and cports.chm), NirLauncher will detect it automatically.
  • The ‘AppName’  value specifies the application name, while the ‘ShortDesc’ value specifies a short description.  If you don’t specify these values, NirLauncher will take them from the version resource of the .exe file.
  • The ‘LongDesc’ value is the text that appeared in the yellow description box of ‘Show Description Text’ option.
  • NirLauncher also allows you to add additional software packages. Just for example, here’s how to add Sysinternals Suite into NirLauncher:
    1. Go to Sysinternals Suite Web page, and download the latest zip file.
    2. Extract the zip package of Sysinternals into a new folder located in the same drive of NirLauncher.
    3. Download the sysinternals.nlp that I created for Sysinternals Suite, and save it into the same folder with all Sysinternals files.
    4. Drag this sysinternals.nlp into the main window of NirLauncher. You can also use the “Add Software Package” from the Launcher menu.
    5. If you did it right, you should now see the Sysinternals package in the main window of NirLauncher. You can switch between the packages by using F3 and F4 keys.
    6. You may notice that full description text and Web Page URL are empty. This is because they are not filled in the sysinternals.nlp that I created.
      However, the ‘Open Web Page’  option (Ctrl+W) will still work properly for most of the SysInternals utilities even without the URL information, thanks to the “I’m feeling lucky” feature of Google. When there is no URL, I simply send the utility name to Google, and the first page in the search result is automatically opened.

Finally, here’s the download link:

Download NirLauncher package with more than 100 utilities

Zip File Information:  (to verify that the downloaded file is Ok)
MD5: b18f2706b2737128a9f7fd01648f5e38
SHA1: 353bd70b747dc73f58daec120df25a23330d0545
Size: 6,685,806 bytes
Number of files in the Zip: 241