A few months ago, I released a new version of both SmartSniff and SniffPass with support for using them with Microsoft Network Monitor 3.x
In the release details, I also specified that ‘Wifi Monitor Mode’ button was added for using ‘Monitor Mode’ under Windows Vista/7/2008, but without giving extensive explanation about how to use this feature. So in this blog post, I’ll add more details about this ‘Wifi Monitor Mode’ and how to use it on SmartSniff and SniffPass.
When a wireless network card enters into a ‘Monitor Mode’, it listens to specific channel that you choose and captures all the packets that are sent by wireless networks on your area in the specific channel that you selected. If the wireless network that sent the packet is unsecured, SmartSniff and SniffPass will be able to show you the packets data.
Before I start to explain you how to use this mode, here’s the system requirements for using ‘Monitor Mode’:
- Unfortunately, this mode is only supported on Windows Vista, Windows 7, and Windows Server 2008. Windows XP is not supported.
- Both the network card and the device driver must support this mode. I currently don’t have a list network cards that support this mode under Windows. However, if you manage to get your card into monitor mode, it’ll be nice if you post your card model as comment to this Blog post.
Also, be aware that according to Microsoft, some Wifi drivers may cause a system crash when entering into monitor mode.
Finally, here’s the instructions for using ‘Wifi Monitor Mode’ with SmartSniff and SniffPass:
- First, download and install the latest version of Microsoft Network Monitor 3.x if it’s not already installed on your system.
- Run SmartSniff if you want to capture general TCP data or SniffPass if you only want to capture passwords. Be aware that SniffPass can only capture passwords that are not encrypted. Most Web sites and services of large companies use SSL to encrypt the passwords, and thus SniffPass cannot capture them.
- Go to the ‘Capture Options’ window (F9), choose ‘Network Monitor Driver 3.x’ as a capture method, and then click the ‘Wifi Monitor Mode’ button.
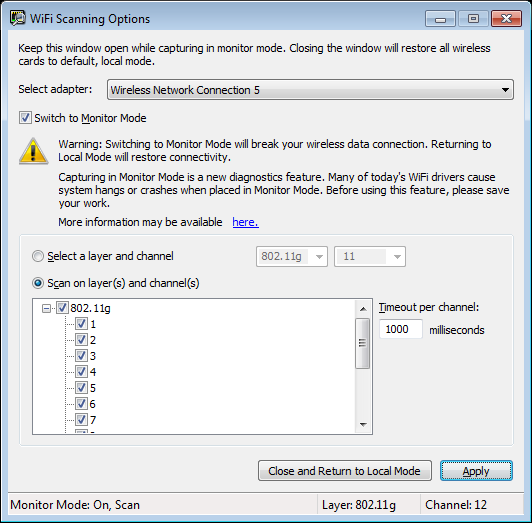
- In the opened ‘Wifi Scanning Options’ window, choose the right wireless card (in most cases you should have only one) and then check the ‘Switch to Monitor Mode’ option.
- You can now select to scan a single channel or to switch between multiple channels every x milliseconds. After you selected the desired channels, click the Apply button.

Wifi Scanning Options
- The most important thing: Leave this window opened !
When you close this window, the network card will exit from monitor mode and it’ll return back to its normal state.
- In ‘Capture Options’ window of SmartSniff/SniffPass – select the right wireless card and then press the ‘Ok’ .
- Finally, press F5 to start the capture. If you have any active unsecured networks in your area, you’ll be able to see the captured data.
- After you finish, close the ‘Wifi Scanning Options’ window, so your wireless card will return back to normal.
The information in this article is provided for educational purposes only and for making people aware of the risks of using unsecured wireless networks. it’s not intended to be used for any illegal activity.


